Generating and Emailing Your Proposal/Invoice
Proposal
- From the event you have created, go to the upper right corner and choose the Quick Reports drop-down menu.
- Select Proposal from the pre-set list of the most popular reports used within events.

- Note: If the pop-up blocker (top of screen) prompts a warning when trying to preview a report, select Always Allow Pop-ups in your browser settings
- A PDF version of the proposal will generate.

- The Filename will automatically fill using the client’s last name, the title of the event (if entered) and the report type.
- You have a few options available:
- Email Report – Send a PDF attachment of the proposal to your client to review.
- Send For eSign – Send the Proposal for electronic signature (contact client care to add this feature).
- Edit Parameters – There are many aspects of the proposal appearance that can be changed. Click this button to see what options are available.
- Save As – Available options to save the file locally.

-
- Refresh – If you made changes to your event in TPP, you may click the refresh button
 to update the PDF version you are viewing to reflect the new changes.
 - Close – Close the pop-up window.
- Refresh – If you made changes to your event in TPP, you may click the refresh button
Emailing Report
Once you click the blue Email Report button, you will go to the Email Report window where you can create your outgoing email.
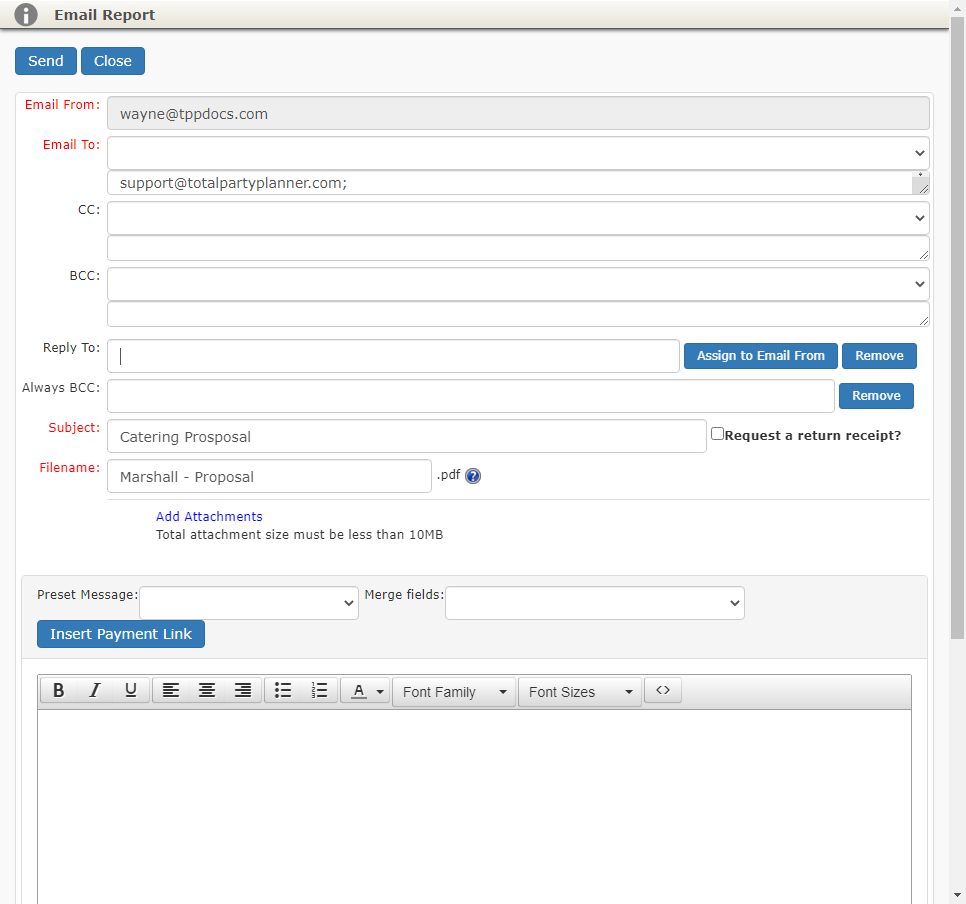
- Email From – You will want to use the Email Setup option to connect your email to TPP
- Email To – This will automatically populate with the email from the assigned Contact on the event
- If you need to change this, simply highlight the current email to erase and manually type the new email in the field
- CC and BCC – Add any CC or BCC email addresses you want here
- Reply To – Enter an alternate email here if you want replies to be sent back to a different email than the one you are emailing from.
- Always BCC – Enter an email that should always be BCCed on outgoing emails.
- Subject – Required field for email subject line
- Filename – Attachment name auto-assigned by TPP
- Add Attachments – Add up to 10MB of additional attachments to include in the email to your contact
- Preset Message – Insert an Email Body Message from your Custom Lists
- Merge Fields – Easily insert specific information into the body of your email using these
- Insert Payment Link – Only available for accounts with TPP Pay
- Insert line of code in the body of the email that will convert to a link when received by client to make payments online via the TPP Pay Portal
- Body – Compose the body of your email here and format using the font toolbar
- Send or Close – Blue buttons at the top and bottom left of the window
- Send – Send the email to your contact
- A copy of the sent email will appear in the Email Sent List and in the event under Tasks/Notes as a completed task
- Close – Cancel and delete the message before sending
- Send – Send the email to your contact
Invoice and Event BEO/Worksheet
- Follow the same steps for the Proposal, except choose Invoice, Event BEO, or Worksheet to view the desired report.
- All options are the same, except Event BEO and Worksheet are internal reports and will not have the eSign option available.