Staff Tab
- Click the Staff tab in the event view.
- Begin by selecting a title from the Blue Drop Down in the bottom left of the grid.
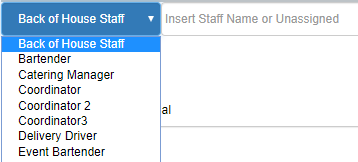
- Then, click where it says Insert Staff Name or Unassigned
- This will show you a list of all the staff members assigned that title.
- You can type to search for a specific name, or click Add Unassigned Employee to add just the staff title and fill in the staff member later, if needed.
- Click on the employee from the list to add them to the event.
- Click into any field with text to edit arrival time, departure, or notes.
- An arrival and departure time can be added, but is not required.
- If the data is entered, the system will automatically calculate the Pay Hours and Billed Hours
- Note: This setting must be turned on in your company’s Profile & Preferences).
- The billed hours can be changed to be the same, or different, than the pay hours.
- Note: The system will default the event’s staff start and end times to the overall event start and end times that were chosen when the event was created.
- If there should be a charge for this staff title to your client, then make sure the Invoice Client box is checked – otherwise un-check it now.
- You have the option to apply Gratuity and Service Charge.
- Click the Save & Close button.