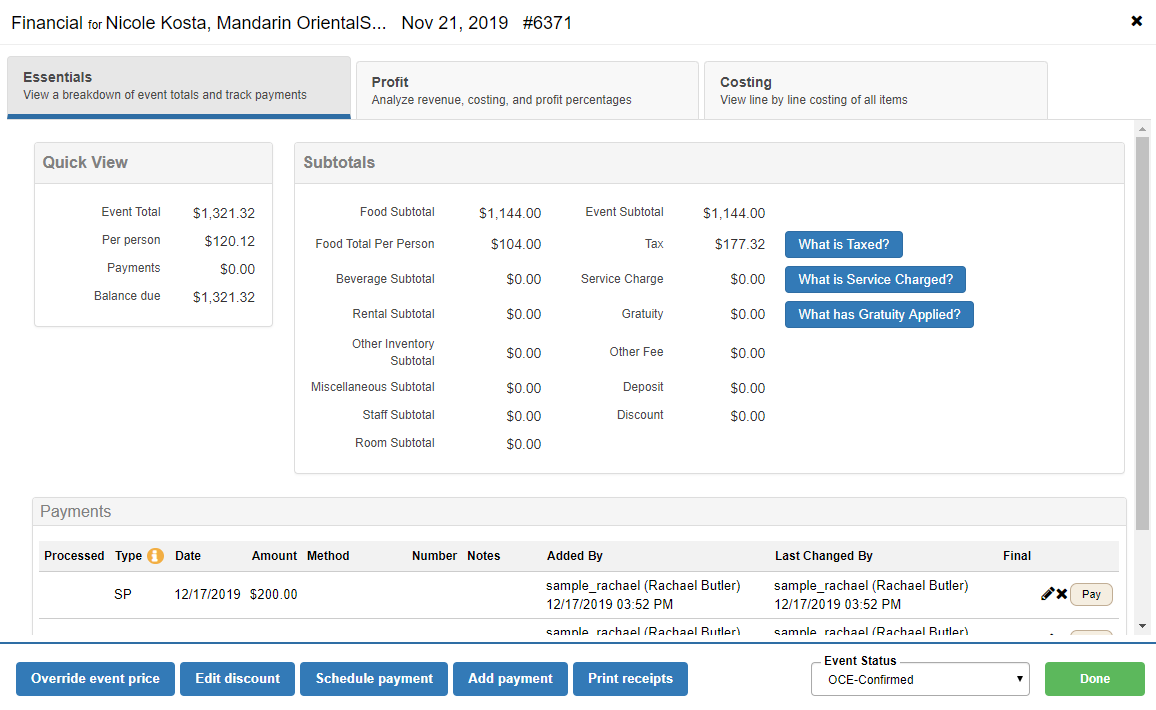
The Financials Tab will allow you to see a snapshot of all of the financial pieces of your event and also make some changes regarding the total of your event.
Essentials Tab
Checking Your Fees & Taxes
After building your event, you may want to double check what items your taxes and fees have been applied to.
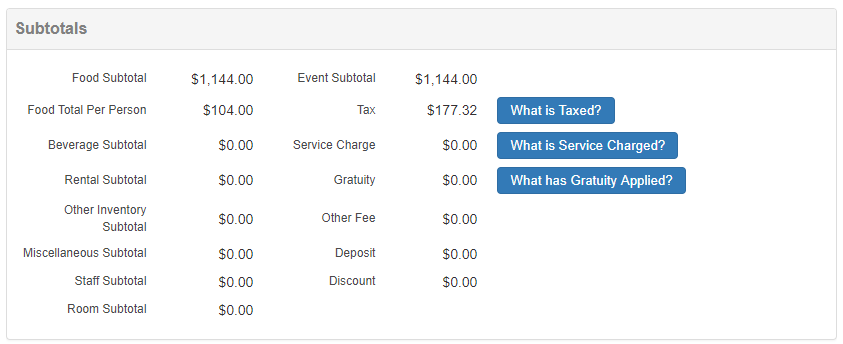

- Click What Is Taxed? to check what tax is applied to individual items on the event. You can select the appropriate tax from the dropdowns to the right. Ensure that the correct total is now being applied to your even by clicking Retotal. Click Save when done to apply the new Tax total.
- Click What Is Service Charged? to check if a Service Charge is applied to individual items on the event. You can check off the appropriate items to be charged to the right. Ensure that the correct total is now being applied to your even by clicking Retotal. Click Save when done to apply the new Service Charge total.
- Click What Has Gratuity Applied? to check if Gratuity is applied to individual items on the event. You can check off the appropriate items to be charged to the right. Ensure that the correct total is now being applied to your even by clicking Retotal. Click Save when done to apply the new Gratuity total.
Overriding The Event Price
If after you build your event, you find that the Total given needs to be overridden, follow these steps:
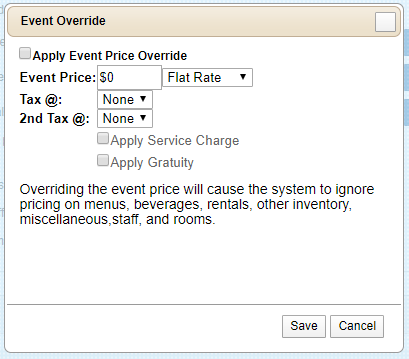
- Click Override Event Price.
- Check off Apply Event Price Override and fill in the appropriate event price as a Flat Rate or Per Person price.
- Select the appropriate taxes from the Tax @ and Second Tax @ dropdowns.
- Check Apply Service Charge and/or Apply Gratuity if needed.
- Click Save to apply the override.
- If you choose to rollback the price to the original pricing, click Override Event Price and uncheck Apply Event Price Override.
Discounts
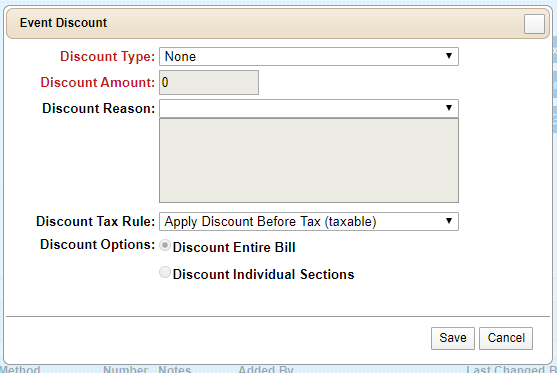
Total Party Planner allows you to setup Event discounts in the following 4 ways:
- A percentage of Food & Beverage items
- A percentage of Food items (excludes Beverage)
- A percentage of the entire bill
- A flat rate amount – ex. $100.00
It is important to note that discounts are NOT applied to the Service Charge fee for the Event. Taxing, however, is calculated on the totals after the discounts are subtracted from the invoice subtotals.
- Follow the Event > Full Search option from the Navigation Bar.
Helpful Hint: To quickly load the previously viewed Contact, use the Contact > Previously Selected option from the Navigation Bar.
- Select an Event by clicking the View link.
- Click the Totals and Payments tab.
- Any Discount totals currently applied to the Event appear on the Discount Amt: line.
- Click the Update Discount button.
Discount by Percentage
- Select the Discount Percentage option.
- Enter the discount amount in the Discount Pct: text field. Be sure to put a numeric value WITHOUT the % sign. Ex 10 (for a 10% discount).
- Enter in a reason for the discount in the Discount Reason field.
- Click the Save button.
Discount Flat Rate
- Select the Flat Amount option.
- Enter the discount amount in the Discount Amt text field. Be sure to put a numeric value WITHOUT the $ sign. Ex 100 (for a $100 discount).
- Enter in a reason for the discount in the Discount Reason: field.
- Click the Save button.
Delete Discount
- Click the Update Discount button.
- Select None from the Discount Type drop-down box.
Click the Save button.
Payments
Total Party Planner will track the payment history of all Event invoices. As payments are received, they will be recorded through the Payments tab of the Financial module. Any invoice which does not have a $0.00 balance will print on the A/R – Open Invoice report for a designated time span.
- Follow the Event > Full Search link on the Navigation Bar.
- Select the appropriate Event by clicking Invoice #.
- Click the Financial tab and scroll down to the Payments section.
Adding or Editing a Payment
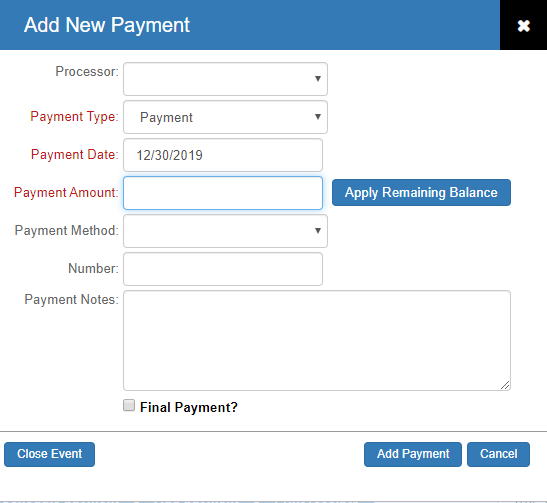
- Click on either the Add Payment button or the pencil icon to the right of an existing payment detail. The Enter Payment Information page appears.
- From the Payment Type: selection box, select either Deposit, Payment, Apply Credit, Unrecoverable, or Gratuity. Deposit and Payment will probably be your most common selection.
Helpful Hint: If using the QuickBooks export feature, be sure to mark deposits with a payment type of Deposit. Deposit payments are NOT exported to QuickBooks due to the timing of receipt. For more information refer to the topic QuickBooks.
- Enter payment information and click the Save button to finish or Cancel to rollback any changes.
Note: As a shortcut to entering a payment amount, you may click the Apply Remaining Balance button. This will automatically populate the payment box with the outstanding invoice amount.
Adding a Scheduled Payment

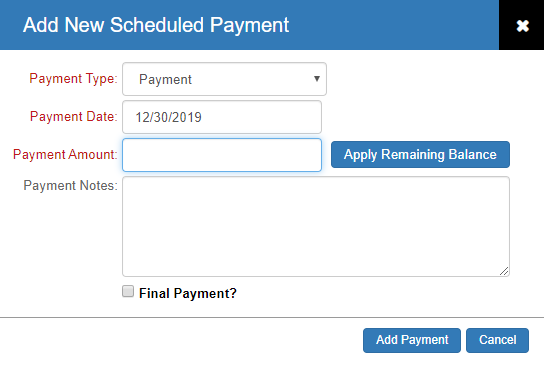
- Click the Add/Edit Scheduled Payment button.
- From the Add Scheduled Payment tab, enter the appropriate information for the future payment and select the Add Payment button.
- These payments will now up on the proposal and/or invoice if those parameters are selected.
Closing an Event
When the first payment of an event is taken, a window will populate asking if you would like to close the event. If you do not wish to change the status of the event, click Cancel. If you do wish to close the event, pick the appropriate Closed status (dictated from Administration>Custom Lists>Event Status) from the dropdown and click Save.
Adding a PO
A Purchase Order number can be added for print to any invoice.
- Click the Main tab.
- Enter in a number in the PO Number field.
- Click the Save button.
Deleting a Payment
- From the Financial>Payments tab, click the X icon to the right of the payment.
- Confirm the deletion by clicking OK.
Printing a Receipt
1. Click Print Payment Receipts to print all associated receipts for the event.
2. Click the second icon to the right of a specific payment to print a receipt for an individual payment.
Financial Module – Costing Tab
Event Menu Tab
The Event Menu window lists all the Menu Items associated with an Event and their respective costs. The default view displays detail ingredient information for each Menu Item and its cost.
- Select the Event > Financial option from the Navigation Bar.
- The Total Menu Item Cost (All Menus) for this event is displayed at the bottom of the window. If no recipe is associated with the Menu Item then all totals will be $0.00.
Helpful Hint: Any menu item’s calculated ingredient amount may be adjusted for this event. Perhaps more or less of a particular ingredient was used for a recipe – which may greatly affect the overall cost of the recipe. You would simply change the quantity that Total Party Planner automatically calculates. Refer to the topic Adjusting Ingredient Amounts for detailed information on adjusting an ingredient amount.
Helpful Hint: For multiple menus, individual Menu costs are sub-totaled and displayed with a yellow row highlight.
Beverage Tab
The total Beverage costs for an event can be displayed in a summary format.
- Select the Event > Financial option from the Navigation Bar.
- Click the Beverage tab. All the Beverage items that were selected for this event are displayed along with their cost. The total cost is displayed at the bottom of the window in the field labeled Total Beverage Cost.
Adjusting Beverage Costs
- Select the item to edit by clicking the Edit link. The Item Cost column is adjusted through the Inventory module. Refer to the topic Maintaining Inventory Costs & Prices for more detailed information on changing unit cost and price.
- Edit the appropriate fields.
- Click the Save button or Cancel to rollback any changes.
Rentals Tab
The total Rental costs for an event can be displayed in a summary format.
- Select the Event > Financial option from the Navigation Bar.
- Click the Rentals tab. All the Rental items that were selected for this event are displayed along with their cost. The total cost is displayed at the bottom of the window in the field labeled Total Rental Costs.
Adjusting Rental Costs
- Select the item to edit by clicking the Edit link. The Item Cost column is adjusted through the Inventory module. Refer to the topic Updating Inventory Costs & Prices for more detailed information on changing unit cost and price.
- Edit the appropriate fields.
- Click the Save button or Cancel to rollback any changes.
Misc. Tab
Financial Miscellaneous Tab
- Select the Event > Financial option from the Navigation Bar.
- Click the Misc. tab. The contact Miscellaneous cost items selected for this event are displayed with their scaled cost. View the total cost for all the items in the text box labeled Total Miscellaneous Cost at the bottom of the screen.
Adjusting Miscellaneous Costs
- Select the item you wish to edit by clicking the Edit link. Refer to the topic Event Miscellaneous Tab for more information on changing these values at the Event level.
- Edit the appropriate fields.
- Click the Save button or Cancel to rollback any changes.
Staff Tab
- Select the Event > Financial option from the Navigation Bar.
- Click the Staff tab. All Staff members, or just generic titles without specific staff assignments, are displayed with their wage, arrival and departure times, and gratuity (applied in this screen). View the total cost for all the items in the text box labeled Total Wage Cost at the bottom of the screen.
Adjusting Wage Costs
- Select the item to edit by clicking the Edit link. Refer to the topic Updating Staff Data for more detailed information on updating staff.
Helpful Hint: Times must be entered into the fields in this exact format: 02:00 PM.
Helpful Hint: Total Party Planner will automatically re-calculate the total hours worked after updating either of the times.
- Total Party Planner will automatically recalculate the total wage cost upon changing any of the fields noted above.
- Click the Save button or Cancel to rollback any changes.
Adjusting Ingredient Amounts
You can also adjust the total amount of any ingredient in a particular Menu Item that was automatically calculated by Total Party Planner. Refer to the topic Building A Recipe for information on associating ingredients (Inventory) to Menu Items.
- Select the Event > Financial option from the Navigation Bar.
- The Event Menu tab is displayed.
- Select an item to edit by clicking on the menu item link.
- Enter a new amount for that ingredient in the Adjusted Amount field on the adjustment form.
- If you want Total Party Planner to recalculate the total Menu Item cost automatically with this new value, click in the Refresh Financial Form After This Update box. To save time when multiple updates need to be performed, leave this box unchecked and click on the Refresh button after all changes are complete.
- Click OK when done entering the new data. Cancel will ignore the change made.
- Once you have adjusted an ingredient for a Menu Item using this method, Total Party Planner uses the adjusted ingredient cost for all other calculations for that ingredient.
Helpful Hint: Any future serving changes to a Menu Item that has an adjusted ingredient are ignored for that ingredient. Adjusted values override the new servings.
Calculating Net Profit
Once all your adjustments to Food & Beverage, Rentals, Miscellaneous, and Staffing have been made you can view the net profit from the selected Event.
- Select the Event > Financial option from the Navigation Bar.
- Click the Net Profit tab.
- Your NET PROFIT is displayed at the bottom of the page
General and Administrative Costs
Use this option as a catch-all for any other fee you wish to add.
- Click the Edit G&A Cost button.
- Enter in the appropriate amount.
- Click the Save button.
- The NET PROFIT will reflect the changes.
Uploads Tab
Event Uploads
The Event Upload feature allows you to store or share files associated to events. For example, you may have a picture of the layout for a room that you are renting, and by using the Event Upload feature you may share this with others or quickly view it for quick reference during planning. You may upload a maximum of three items.
Uploading an Item
- After navigating to an event, click the Uploads tab.
- Click the Upload a File button.
- Enter in the path, or click the Browse… button to search for the item.
- Click the Save button. The item will then be uploaded.
- Select Close to view the item.
Downloading an Item
- Click the Download link.
- Choose whether to open it or save it to your disk.
- Click the OK button.
Deleting an Uploaded Item
- Select the item you wish to delete by clicking the X icon to the right of the item.
- Confirm the deletion by clicking the OK button.
Task/Notes Tab
For each specific Event, schedule tasks and record special notes within the Tasks/Notes Tab. Unlike the Event notes, this module will help you keep track of a particular contact and your dealings with them. Examples are phone calls, meetings, prospects without events, etc.
Adding or Editing a Task
- After navigating to an event, select the Tasks/Notes tab and select the Tasks sub-tab.
- Click Add Task from the toolbar to the left to make a new task, or click the pencil icon to the right of an existing task to edit it.
- (Required) Select an Owner: from the drop-down list. The owner is who the note belongs to.
- Select a Task Action. This is the category of the action you need to complete; for example, an outbound call, a meeting, etc.
- Associated Contact will auto-populate the contact on the event.
- (Required) Enter a Subject.
- Enter the task description. This is the information or details of the task.
- Select the date the task must be completed on with the Due Date: selection box.
- Select a priority.
- Select the Completed? checkbox if the task is closed.
- Set a reminder by selecting the Set Reminder? checkbox, then filling out the form that appears.
- Date & Time (required): Date and time the email will be sent to the email you specify.
- Email Reminder To: The email recipient(s). You can select them from the drop-down box or or by entering the emails (separated by commas) in the textbox.
- Click the Save button.
Adding or Editing a Note
- After navigating to an event, select the Tasks/Notes tab and select the Notes sub-tab.
- Click Add Note from the toolbar to the left to make a new note, or click the pencil icon next to an existing note to edit it.
- (Required) Select a Note Owner: from the drop-down list. The owner is who the note belongs to.
- Associated Contact will auto-populate the contact on the event.
- (Required) Enter a Note Title.
- Enter the information you want the note to contain in the Note Content textbox.
- Email the note to yourself or others by selecting an email from the Email Note To: selection box or by entering the emails (separated by commas) in the textbox.
- Click the Save button.
Deleting a Task or Note
- After navigating to an event, select the Tasks/Notes tab and select the Tasks or Notes sub-tab.
- Delete a task or note to remove by clicking the X icon to the right of the item.
- Confirm the deletion by clicking OK.
Printing the Notes
The notes are printed through the main report module. Refer to the topic Report Selection for more information on printing reports.
Admin Tab
View information regarding who and when an Event was added and changed. Add a message to appear on the Event Invoice.
- Select the Event > Full Search option from the Navigation Bar. Refer to the topic Updating Event Data for more detailed information on searching for an Event.
Helpful Hint: To quickly load the previously viewed Event, use the Event > Previously Selected option from the Navigation Bar.
- Select an Event by clicking the View link.
- Click the Admin tab. The Event Add Date:, Added By:, Event Last Change Date:, and Last Changed By: fields are generated from changes made by Login ID.