
Creating an Event Walkthrough
- Select Event | Add New Event from the main toolbar.
Creating an Event Pop-up Window
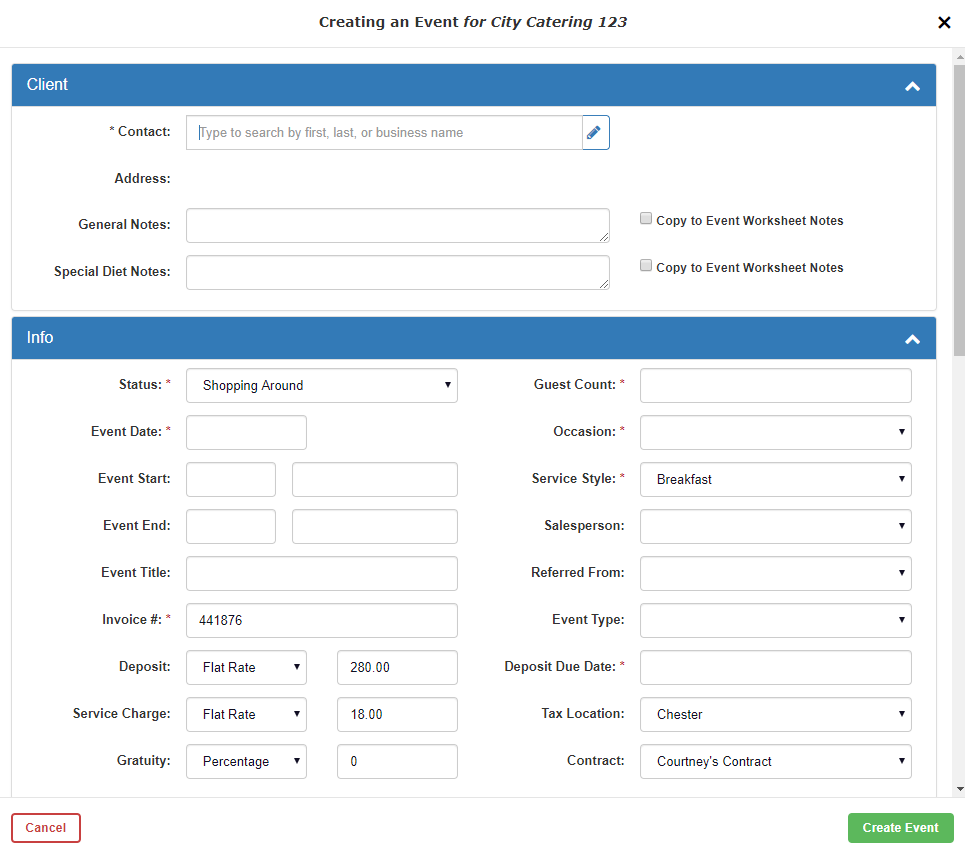
Client
Also referred to as Contact/Lead
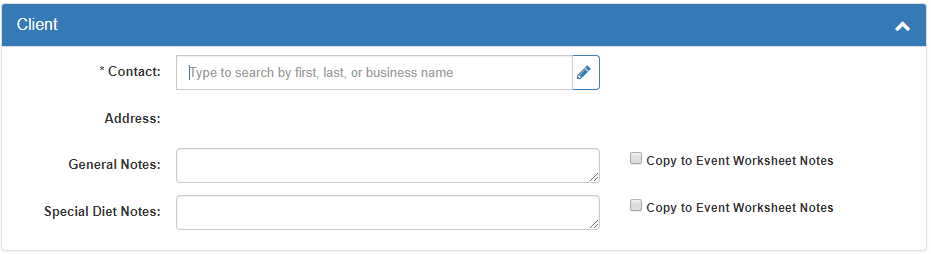
- Begin typing the name of the contact or company you would like to add to this event into the Contact text box.
- Choose from a dropdown list of the contacts added in Step #2.
- You can also add notes to this contact by typing into the “General Notes” or “Special Diet Notes” fields.
Info
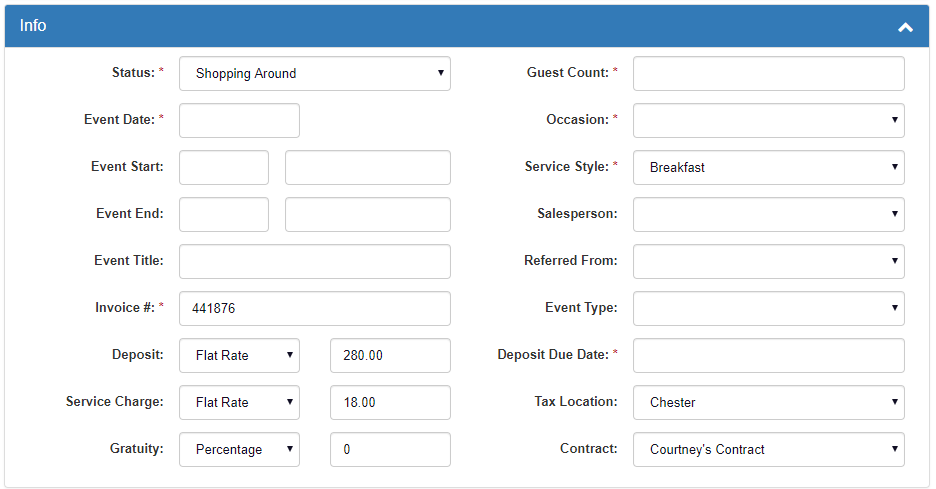
- Change the event Status in the dropdown list if necessary.
- Select an Event Date using the dropdown control.
- Event Start/Event End can be used to indicate the times an event begins and ends. This will also automatically add these times to your event timeline. These are optional fields.
- The Invoice number generated for a new event is the next sequential invoice number available in the sequence. You may edit this number, however, duplicate invoice numbers are not allowed.
- Enter the Guest Count.
- Select an Occasion and Service Style from the drop-down list. Use the Quick Add… button options to add any new items to the list. Note: This list is fully customizable later to match your business requirements.
- Select the tax from the Tax Location dropdown list that was setup in Step #1. If the contact is tax exempt, check the Tax Exempt checkbox on the Event Main window once saved.
- Optionally, enter the Event Type, Referred From, Sales Person, and Event Title.
- Optionally, enter an Event Contract, Payment Terms, Deposit Detail, Service Charge, and Gratuity.
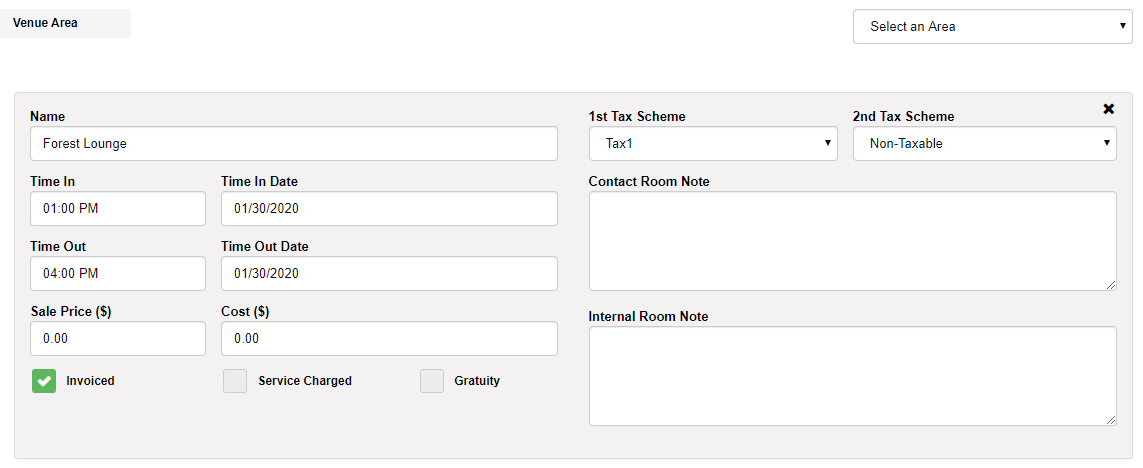
Venue
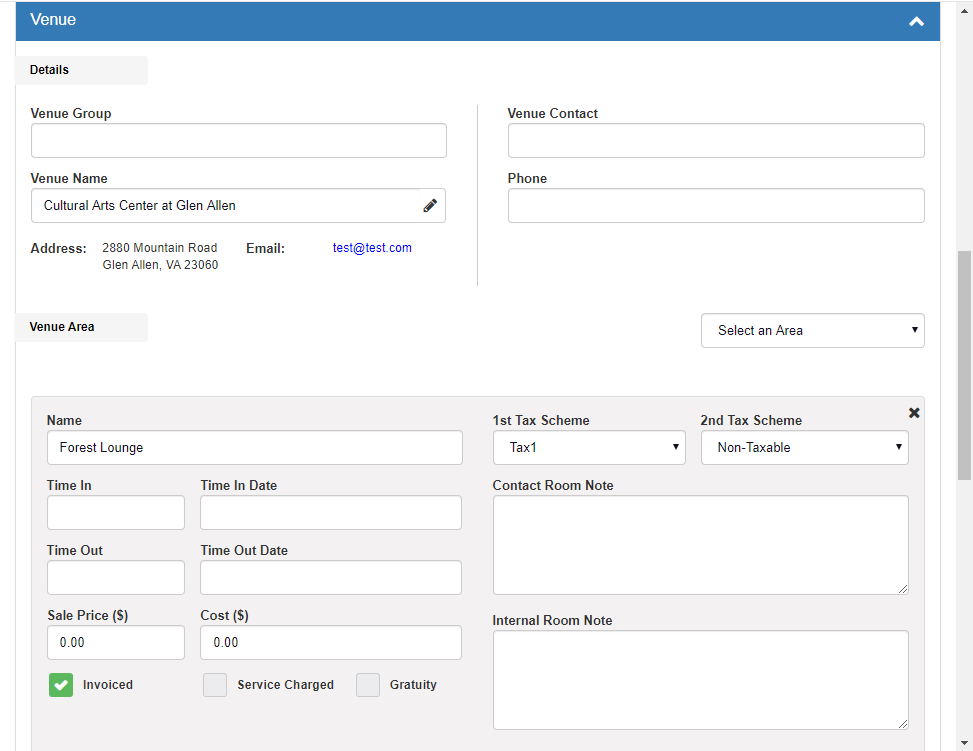
- Under Venue Details, begin typing the name of the venue you would like to add to this event into the Venue Name text box.
- This will default as Same as Contact unless you set up a default venue in Step 1.
- You may optionally enter venue details such as venue contact, contact phone number, areas/rooms within the venue, and additional Venue Fees.
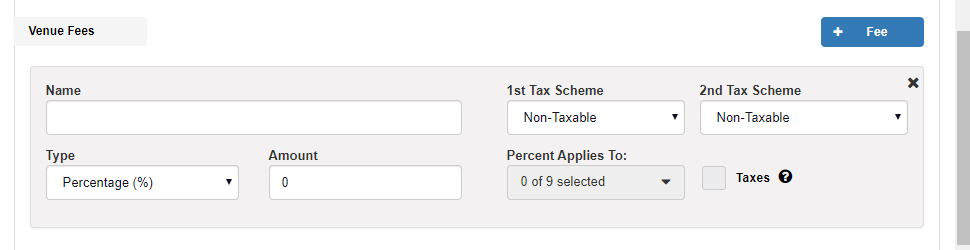
Other Fees

- You may enter a customized Other Fee percentage applied to whichever sections of the event you wish, if needed.
Last Step

- Lastly, click the Create Event button and the Event Info Tab window is displayed.
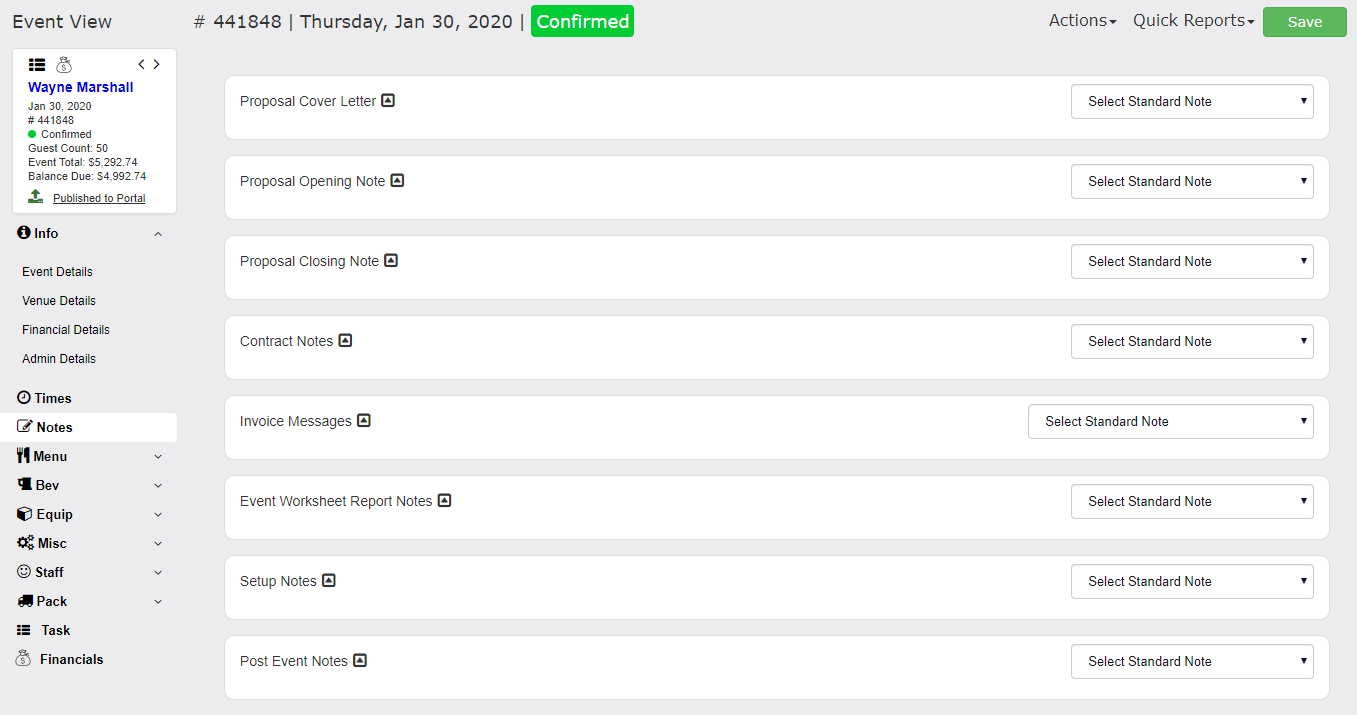
Info Tab
Event Details
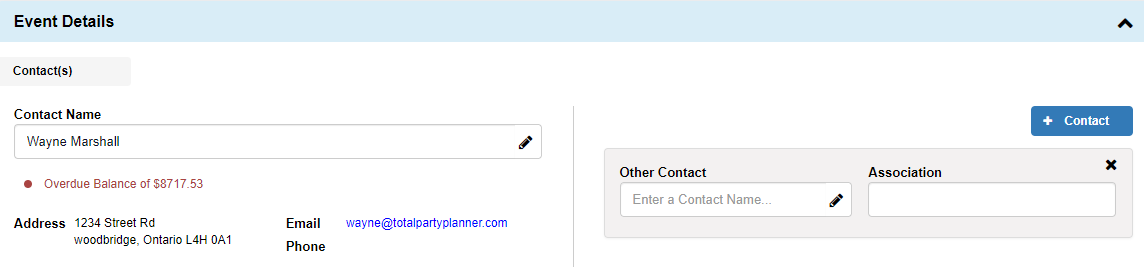
Contact(s)
The Contact(s) area shows the contact you chose on the Creating an Event pop-up window.
You may also enter Other Contact(s) here, such as Bride, Groom, Co-Host, etc.
Note: Other Contacts will have to be added to your contact database using the same method from Step 2 above.
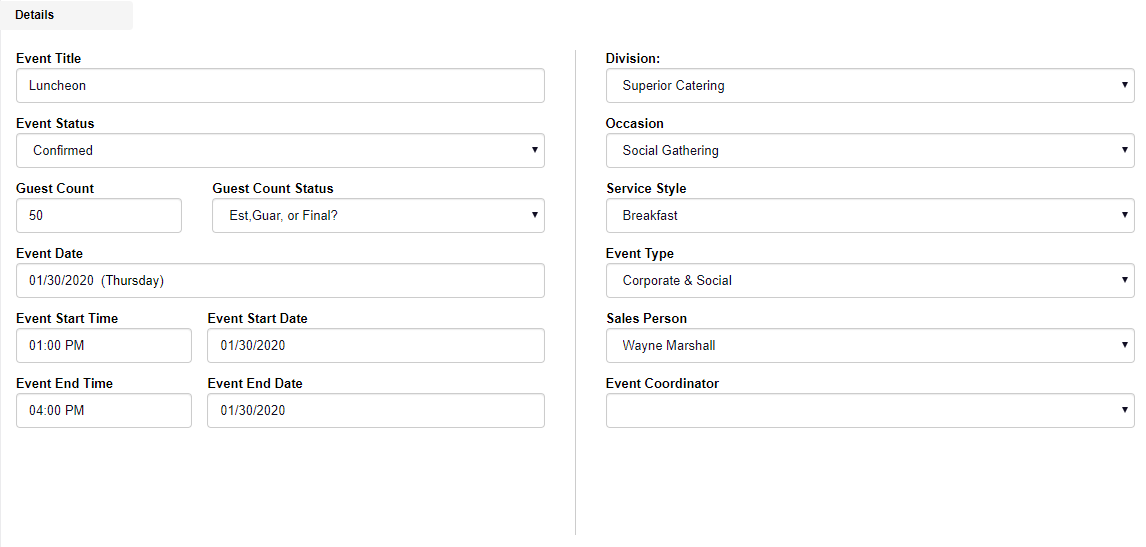
Details
The Details area shows all the information you entered on the Creating an Event pop-up window.
Additional (optional) field options here include:
- Guest Count Status: Use this to define the status of the guest count with your client.
- Division: Used for clients who have added Business Locations/Divisions to their subscription.
- Contact Client Care for more information.
- Event Coordinator: If you have a different person on staff who will Coordinate the event after the sale then you may enter them here.
Venue
Details
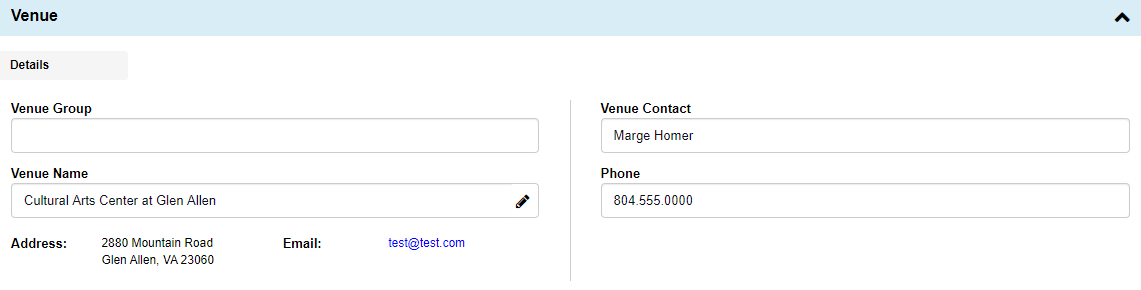
Venue Area
Venue Fees

Financial Details
Financial Details shows all the information you entered on the Creating an Event pop-up window.
Additional (optional) field options here include:
- Tax Exempt: Use this to mark your client as Tax Exempt.
- Items sold that qualify for tax exemption are defined by you under the Taxing Rules area.
- BEO #: If you have a BEO# outside of TPP that you want to make a note of, enter it here.
- PO #: If a client gives you a purchase order number you may make a record of it here.
- Payment Terms: Enter the payment terms agreed upon between you and the client.
- Example: Cash, Check. Net 30, Net 60, Gift Certificate, etc.
- You are able to add additional Payment Terms under Administration > Custom Lists > Payment Terms.
- + Scheduled Deposit: You are able to make a note in the financial area that shows the deposit due date on client facing documents.
- Net Due Terms: This will default to what you defined in the Profile & Preferences area under Event Main Defaults.
- You are able to change this within the event without changing your default setting.
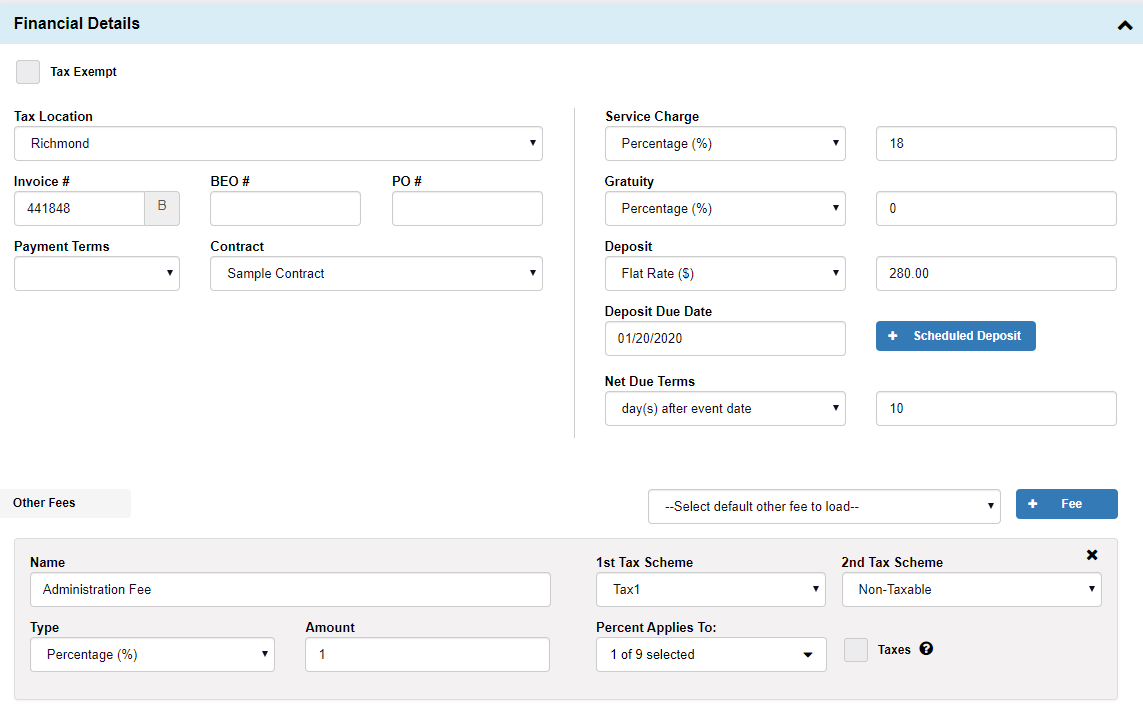
Other Fees
Other fees is a catch all area for anything that doesn’t fit anywhere else. Many of our clients use these for admin fees, processing fees, or anything else you can think of.
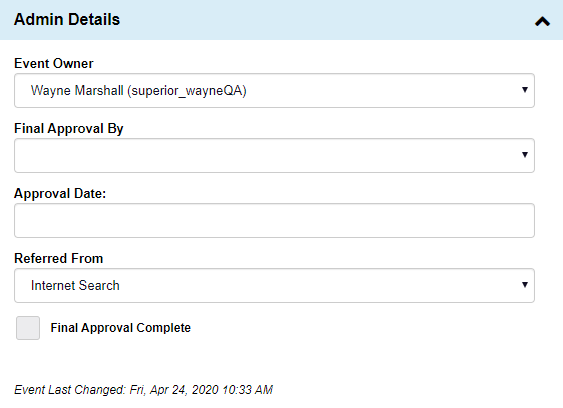
Admin Details
Admin Details shows some information you entered on the Creating an Event pop-up window.
Additional (optional) field options here include:
Event Owner: Define who “owns” the event.
Final Approval By: Have someone on your team give final approval on all events.
Approval Date: Enter the day of final approval.
Final Approval Complete: Mark the event as approved and completed.
Click here for more info about the new grid view options.
Times Tab
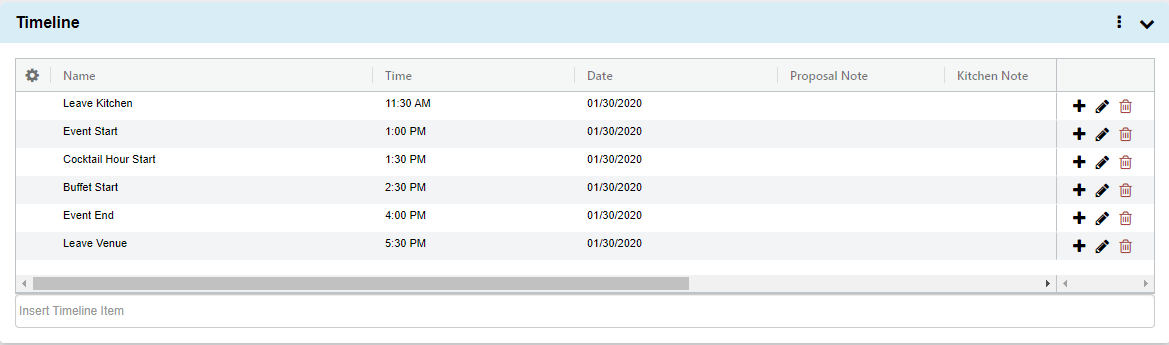
- Click on the Timeline tab of the event view screen.
- If either the event start or end times were entered on the Creating an Event pop-up window, they will already appear in the grid.
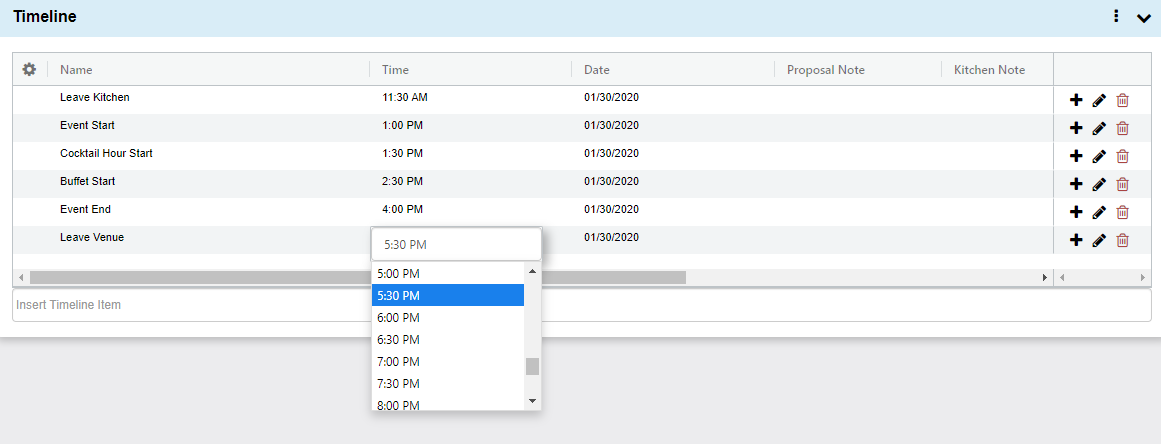
- Type the desired timeline label into Insert Timeline Item field below the table to search for existing times in your database.
- If the time does not currently exist, you can add it by clicking “Quick add as new time”.
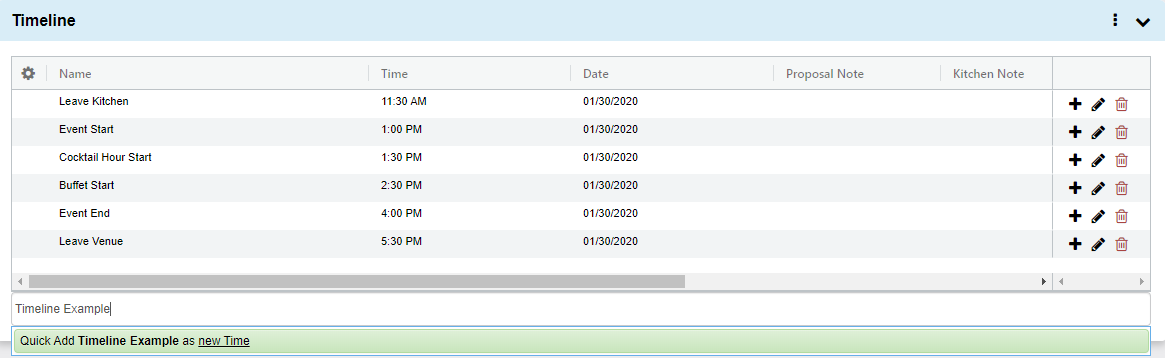
- You can click on any area in the grid with text to add/edit it within the table.
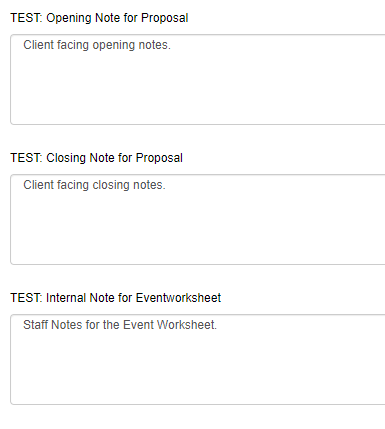
Notes Tab
(all fields are optional)
- Click the Notes tab of the event view screen.
- Proposal Notes are broken down into a Cover Letter, Opening Note, and Closing
- Note. You may want to use the cover letter as a greeting, the opening note as an introduction to the event or menu, and the closing notes to get more specific about terms, etc.
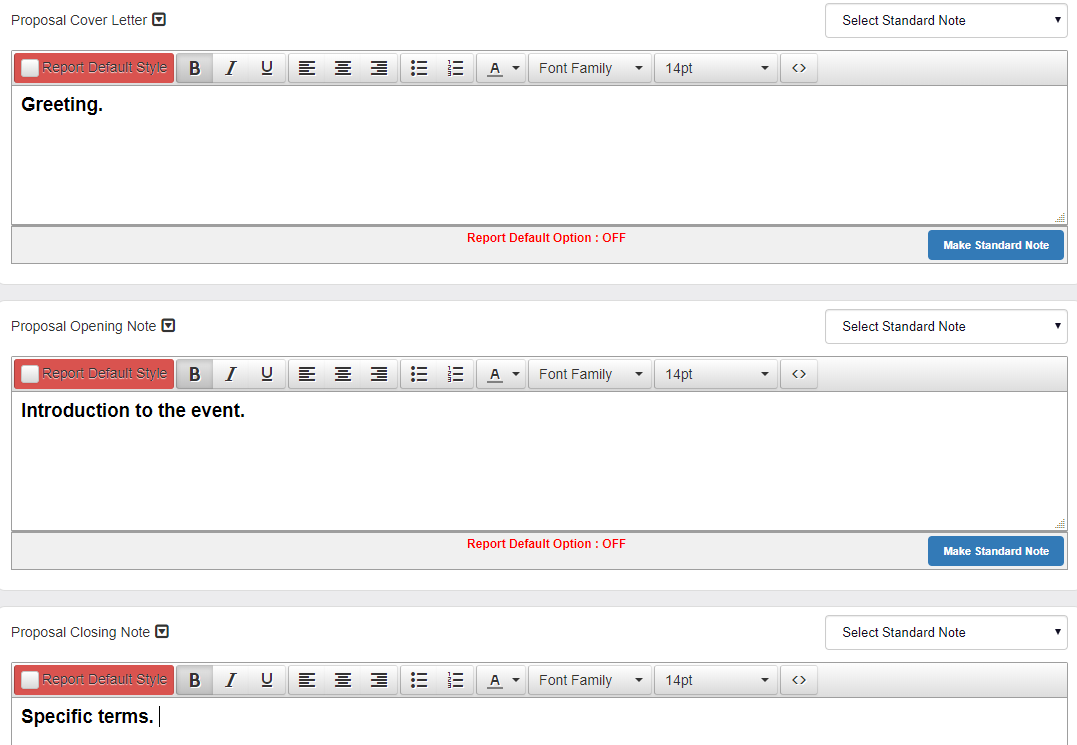
- Contract and Invoice Notes will populate in a special event specific section of the respective reports.
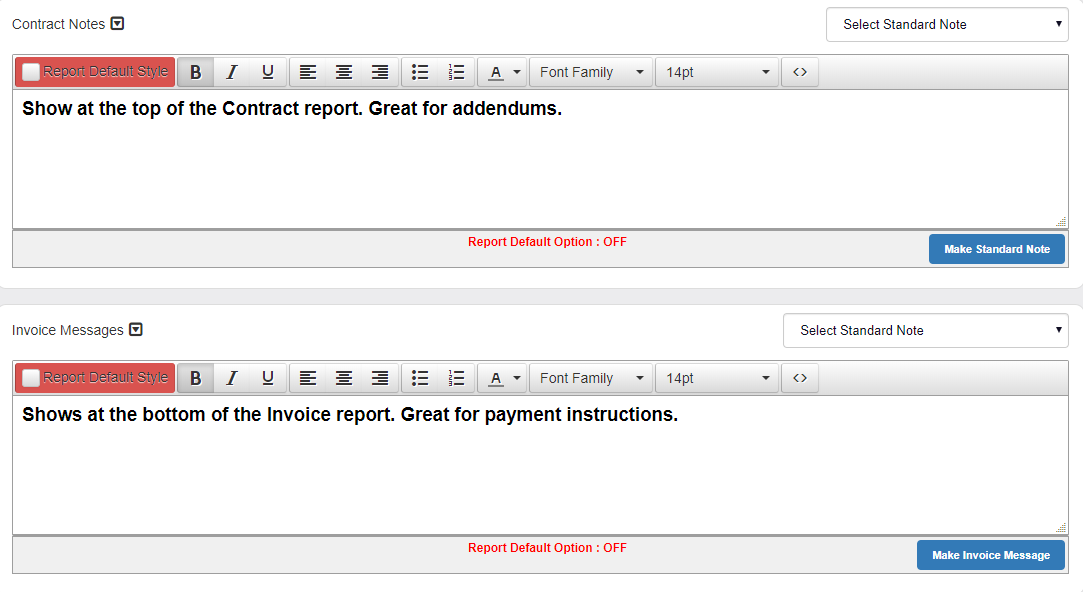
- Enter Event Worksheet Report Notes and Setup Notes.
- These notes print to the Event Worksheet & BEO report.

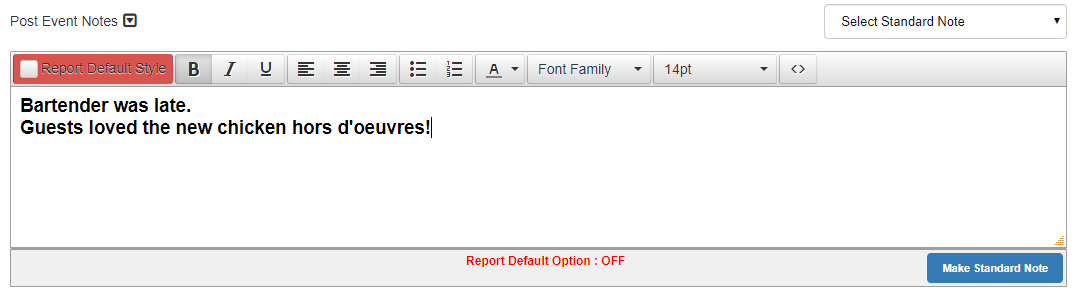
- The Post Event Notes section is for your team’s use after the event.
- Any notes you would like to save after the event has taken place will go here for your reference.
- This is a good way to keep track of feedback from events for later reference.
- There is a Post Event Notes report that can be pulled across a date range to get an overview of this information.
Be sure to click the Save button at the far right of the event header!
Menu Tab
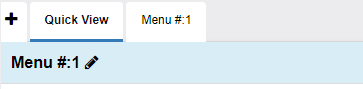
- The “Quick View” tab shows you all of your menus on one screen!
- Click the Pencil next to Menu #:1 to rename your menu, then press the check that appears to save!
- Before adding any menu items, you’ll want to decide the type of costing for the event.
- There are 2 pricing models built into the database:
- Per Serving Pricing
- Itemized Pricing.
- There are 2 pricing models built into the database:
Per Serving Pricing
Per Serving pricing (sometimes called Per Person pricing) takes the number of servings you specify and multiplies by the designated cost per serving.
- Enter the total number of Servings (initially defaults to the event’s guest count).
- Enter the Price Per Serving.
- This is the flat price you are charging for everything shwing on the selected menu tab.
- Next, you’ll want to double check your taxes for this menu, as well as whether Service Charge and Gratuity should be added.
In this example the client is charged for 55 Servings @ $20 per serving = $1100.00 on the invoice.

Itemized Pricing
Itemized pricing (sometimes called à la carte pricing) calculates event menu items prices individually.
- The Servings and Per Serving Price are inactive since itemized pricing is set individually on each item you add.
- Next, you’ll want to double check your taxes for this menu, as well as whether Service Charge and Gratuity should be added.
In this example, 2 items are priced at at $25.00/each and 1 Cheese Tray at $66.00/each = $116.00 on the invoice.

Adding Menu Items
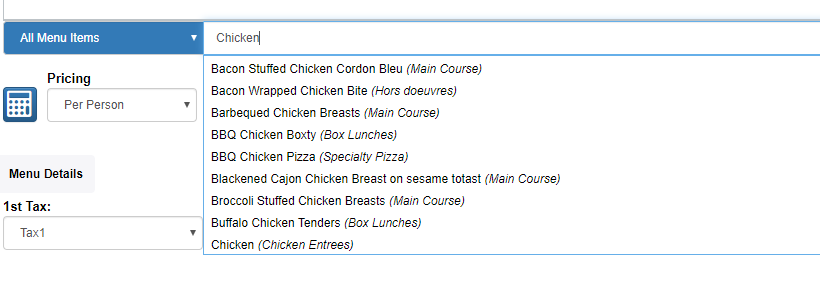
- To start adding menu items to this event, click beneath the menu window on “Insert Item Name”, and begin typing to search all of your menu items for matches.
-
- If a Menu Item does not currently exist, you can add it by clicking the green “Quick Add “name” as New Item”

- Search for one of the menu items added to your database on the Add Menu Items tab.
- Note: You will have to type at least 3 letters for results to appear.
- Click the Menu Item you want from the results list to add it to the event!
- You will then be asked to set the amount of that item to add to the event.
- Note: It will default to your event’s guest count.

- Type in the quantity, then select a unit, and hit enter, or click elsewhere, to save!
- Repeat this process until you have added all your menu items!
- You can click into any field in the grid to edit!
- This will allow you to add “Proposal Notes” & “Kitchen Notes” specific to any item!
- To add Notes to the overall menu, scroll down and click into any of the notes fields!
-
- You may enter any Proposal Notes (for the Proposal of Service report) or Internal Notes (for the Event Worksheet/BEO report).
- Click the Save button at the far right of the event header.
Beverage, Rental/Other Inventory & Miscellaneous Tabs
These tabs all function very similar to the Menu tab!
As a recap:
- Type underneath the grid where it says “Insert Item Name” to begin searching your existing items (Note: You must type at least 3 characters to begin searching!)

-
- If the item is not currently in your inventory, you can add it by typing the item name, then clicking the Green “Quick add [item name] as new item” item that will appear under the search.
- Add the pertinent information in the “add new inventory” pop up, then hit save!
- Click the item in the list below the grid to add it to your event! Then type in the Quantity and select a Unit (if applicable).
- Hit “Enter” or click elsewhere to finish adding the item!
- You can click into any area with text to edit the items, and you always have the option to add notes to the overall section via the Notes below the item grid!

Staff Tab
- Click the Staff tab in the event view.
- Begin by selecting a title from the Blue Drop Down in the bottom left of the grid.
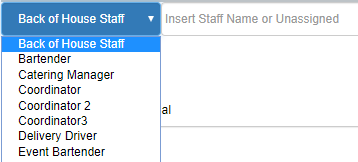
- Then, click where it says “Insert Staff Name or Unassigned”.
- This will show you a list of all the staff members assigned that title.
- You can type to search for a specific name, or click “Add Unassigned Employee” to add just the staff title and fill in the staff member later, if needed.
- Click on the employee from the list to add them to the event.
- Click into any field with text to edit arrival time, departure, or notes.
- An arrival and departure time can be added, but is not required.
- If the data is entered, the system will automatically calculate the Pay Hours and Billed Hours
- Note: This setting must be turned on in your company’s Profile & Preferences).
- The billed hours can be changed to be the same, or different, than the pay hours.
- Note: The system will default the event’s staff start and end times to the overall event start and end times that were chosen when the event was created.
- If there should be a charge for this staff title to your client, then make sure the Invoice Client box is checked – otherwise un-check it now.
- You have the option to apply Gratuity and Service Charge.
- Click the Save & Close button.
Generating and Emailing Your Proposal/Invoice
Proposal
- From the event you have created, go to the upper right corner and choose the Quick Reports drop-down menu.
- Select Proposal from the pre-set list of the most popular reports used within events.

- Note: If the pop-up blocker (top of screen) prompts a warning when trying to preview a report, select Always Allow Pop-ups from This Site.
- A PDF version of the proposal will generate.

- The Filename will automatically fill using the client’s last name, the title of the event (if entered) and the report type.
- You have a few options available:
- Email Report – Send a PDF attachment of the proposal to your client to review.
- Send For eSign – Send the Proposal for electronic signature (contact client care to add this feature).
- Edit Parameters – There are many aspects of the proposal appearance that can be changed. Click this button to see what options are available.
- Save As – Available options to save the file locally.

-
- Refresh – If you made changes to your event in TPP, you may click the refresh button
 to update the PDF version you are viewing to reflect the new changes.
 - Close – Close the pop-up window.
- Refresh – If you made changes to your event in TPP, you may click the refresh button
Invoice and Event BEO/Worksheet
- Follow the same steps for the Proposal, except choose Invoice, Event BEO, or Worksheet to view the desired report.
- All options are the same, except Event BEO and Worksheet are internal reports and will not have the eSign option available.
Congratulations!! Your first event is complete.