Info Tab
The Main tab lists the administrative detail of an Event. Think of it as the who, what, when, and where. It also shows some of the financial detail.
- Select the Event > Full Search option from the Navigation Bar.
- Select the appropriate Event by clicking the Invoice # link.
Helpful Hint: To quickly load the previously viewed Event, use the Event > Previously Selected option from the Navigation Bar.
- The Event Main tab is where you will enter the header information for an Event, such as Contact, Venue, Occasion, Service Style, etc.
Editing an Event

- Select the Event > Full Search option from the Navigation Bar. Refer to the topic Updating Event Data for more detailed information on searching for an Event.
Helpful Hint: To quickly load the previously viewed Event, use the Event > Previously Selected option from the Navigation Bar.
- Select the Event you wish to edit by clicking the Invoice # hyperlink. Edit the following information about the event:
- Contact Detail:
- Company and Name: If this is a new Event or when editing, click the Assign button.
- Select the way you would like the contacts to be sorted by clicking the Search drop-down box.
- In the textbox, type the subject you wish to search for.
- If the Contact does not yet exist in the database, click the Add New Contact button to add the contact.
- Refer to the topic Updating Contact Data for more details on adding Contacts.
- Contact Detail:
Helpful Hint: Use the Quick Edit Contact button to load the Contact module with the contact selected for this Event. There you can view more information such as address, phone numbers, etc.
-
- Event Detail:
- Date: Enter a date for the event in mm/dd/yyyy format.
- Event Detail:
Helpful Hint: Total Party Planner also provides a shortcut to entering the Event date. Click the drop-down menu in the Event Date text box to view a mini Calendar screen. Scroll through the calendar months and years, and click a day. The selected date will appear on the Event.
-
-
- Occasion: Select an occasion for this event from the drop-down list. If the occasion type does not yet exist in the system, select the Add New Occasion from the drop-down list. Refer to the topic Occasions for information on editing this list.
- Service Style: Select a service style for this event from the drop-down list. If the service style type does not yet exist in the system, select the Add New Service Style from the drop-down list. Refer to the topic Service Styles for information on editing this list.
- Event Type: Select the event type for this event from the drop-down list. If the event type does not yet exist in the system, select the Add New Event Type from the drop-down list. This field is optional.
- Salesperson: Select a name from of the pull-down list. This is the person responsible for entering this event’s information. New salespeople are entered through the staff module or you may select the Add New Salesperson from the drop-down list to quickly add a salesperson not already in the system. This field is optional.
-
Note: Salesperson staff members can have any title, however, the Salesperson indicator must be checked for them to be available at the Event level. Refer to the Updating Staff Data topic for more detail on adding staff members.
-
-
- Referred From: Select a referral from the drop down box, or select Add New Referral from the drop-down menu to add a new referral not already in the system. This field is optional.
- Event Title: Specify an event title if appropriate. This field is optional.
- Status: Select a status for the event from the drop down box. The default statuses that Total Party Planner provides are Inquiry, Proposal, Confirmed, Closed, or Cancelled. When changing an event status, a reason for the change can be added in the Status Change Reason drop-down list. Select a reason from the drop down box, or click Add New Reason to add a new if it is not already in the system. This field is optional.
- Guest Count: Enter the planned number of guests for the event.
- Venue Detail: Each event much be assigned a Venue (Location). To select a venue, click the Assign button for a new event, or Change Venue if you are editing an existing event.
- Select a Venue by clicking Select. As an option, you may check the Venue is Same as Contact Address check box. Checking this option tells Total Party Planner that the Event will be held at the same address on file for the selected Contact. This feature will save you data entry time by not having to duplicate address information.
- You may also search for a specific venue by using the Search bar at the top of the page. Select how you would like to search for the venue in the drop-down list, then enter the search terms in the textbox. Choose how you would like to sort the results by selecting an option from the Ascending/Descending drop-down list. Select the venue status and if the venue is on or off-premise.
- If the venue does not exist in the system, click the Add New Venue button to add the new venue.
- Room/Area(s) If the selected Venue has Room or Area associations (ex banquet rooms, floors, building wings), then one or more of those Rooms/Areas may be assigned to the Event. To add an Area, click the Add/Remove Room button under the Main tab. Select an area from the list by checking the appropriate box(s) and clicking the Assign Selected button. When finished adding Venue areas, click the Back to Event button. To remove an Area, select the assigned area from the Areas Assigned to Event tab and click the Remove Selected button.
-
Helpful Hint: If there are other Events on the same day with the same Venue assignment, Total Party Planner will prompt you with a warning message.
-
- Times: Enter the relative times for an Event. By default the date associated to the time will be entered as the Event date. Change the date if appropriate. Ex., perhaps the Setup time is the day before the Event. In this case you would want to manually update the date. You may enter more detailed times under the Timeline Tab. Refer to the topic Event Timeline for more detail on adding detailed times.
- Financial Detail:
- Tax Location: Choose the tax scale locality for the event from the drop down list.
Helpful Hint: Total Party Planner will remember the last tax scale you used when creating an Event and use that scale as the new default.
-
-
- Tax Exempt: If the event is tax exempt, check this box. Tax exempt values will be applied as setup in the Taxes module or the miscellaneous module. When selecting a contact for a new event, if that contact has a tax exempt number, Total Party Planner will prompt you to check the box.
- Contract: Select the contract you would like to apply to this event. Please see the Contracts topic for more information on creating contracts.
- Terms: Select the terms of payment from the drop down box that you require for the Event. This information appears on the invoice only. Actual payments received are recorded through the financial module. If you need to add a new terms of payment, select Add New Payment Term from the drop-down list.
- Net Due: Select the appropriate ‘Day of event’, ‘Day(s) prior to event’, or ‘Day(s) post event’ option from the drop down box. Enter the terms (in days) when payment will be due. Term days can be pre or post the actual Event date. The Accounts receivable report will only reflect the invoices which are actually due for Events based on the terms setup in this section.
- Svc Charge: Select the appropriate ‘Percent’, or ‘Flat Rate’ Event option from the drop down box to apply to the Event. Enter a number for the amount of the charge. Enter zero if this is not applicable. The field is flexible as to what it actually applies to. Refer to the topic Business Profile and Event Defaults for more information on changing the default name.
- Gratuity: Select the appropriate ‘Percent’, or ‘Flat Rate’ Event option from the drop down box to apply to the Event. Enter zero if this is not applicable. The field is flexible as to what it actually applies to. Refer to the topic Business Profile and Event Defaults for more information on changing the default name.
- Other Fee %: Enter another miscellaneous charge percentage to apply to the event. It can be named, or apply, to anything! For example, apply a 2% ‘damage waiver fee’ to any rentals assigned to the event. The field is flexible as to what it actually applies to. Check the appropriate boxes (Menus, Beverages, Rentals, Miscellaneous, or Staff) to apply the percentage appropriately. The name of this fee is initially set in the business section. Refer to the topic Business Profile and Event Defaults for more information on changing the default name. At the event level, however, it is updateable to anything desired. Ex. Instead of ‘damage waiver fee’, we could display ‘food handling charge’ – just for this event.
- Deposit: Deposits can be specified as a percentage of the entire bill or a flat rate. Put the amount (percent or dollar) in the text box. Specify the type by choosing the appropriate ‘Percent’ or ‘Flat Rate’ option. Deposit requirements are listed on the Proposal and Contract reports.
- Deposit Due Date: Enter a date for the event in mm/dd/yyyy format. Or click the drop-down menu to view a mini Calendar screen. Scroll through the calendar months and years, and click a day. The selected date will appear on the Event.
- BEO: Optionally add a Banquet Event Order number.
- PO Number: Optionally add a Purchase Order number.
- Invoice #: The invoice number generated for a new Event is the next sequential invoice number available in the database. You may edit this number to a different number (perhaps to start your invoice numbers at a certain range), however, duplicate invoice numbers are not allowed.
- Final Review: Check this box if the all the Event information has been confirmed either internally or with your Contact. The Event will no longer be listed in the initial startup warning screen as requiring final review.
-
After all the information has been entered, click the Save Changes button in the red toolbar to the left. Total Party Planner displays the date this event was last changed in the Last Changed: field.
Event Notes Tab
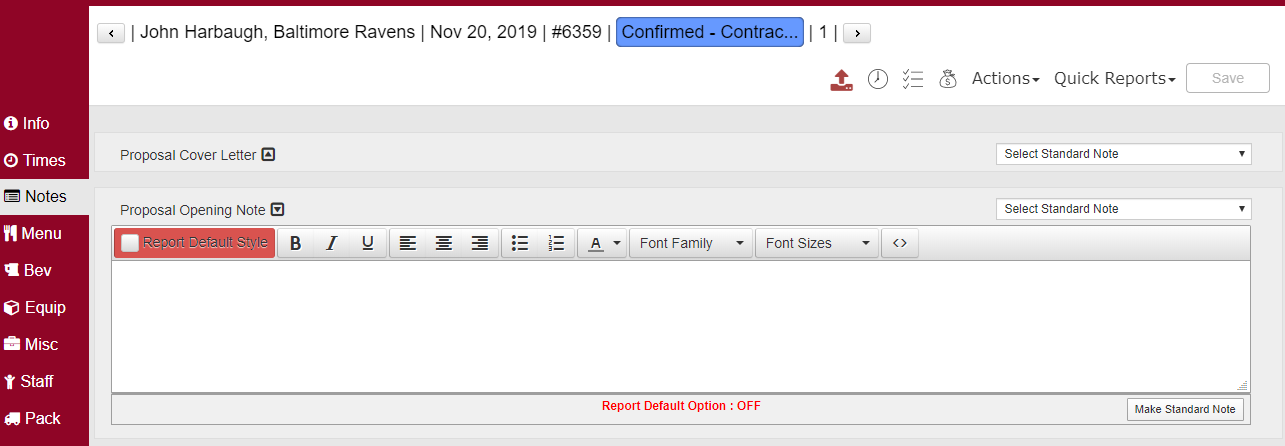
Event notes are used as a tool to communicate information to the Contact, Kitchen, or even for historical informational purposes.
- Select the Event > Full Search option from the Navigation Bar.
- Select the appropriate Event by clicking the Invoice # link.
Helpful Hint: To quickly load the previously viewed Event, use the Event > Previously Selected option from the Navigation Bar.
- Click the Notes tab.
- Click the Add Note button associated to the notes field you wish to update or click into the appropriate text box.
- Enter the following note information:
- Cover Letter: Draft a letter that will precede your proposal on a separate page. The page will have your letterhead and company information if you have selected that to print on your proposal.
- Proposal Notes (Top): Enter any notes exactly as you want them to appear on the Proposal of Service report to the Contact. Optionally, you may want to create a standard note for quick selection and addition on the Proposal.
- To edit standard note templates, navigate to Administration > Custom Lists > Standard Event Notes and click the Add New Message Button.
- Enter in your desired note’s subject and message.
- Click the Save button in the red toolbar to the left.
- Proposal Notes (Bottom): Similar to the Proposal notes discussed above except these notes will print as the very last section of the Proposal. Perhaps you want to discuss more of the financial detail here rather than immediately at the top of the Proposal report. Click the Save button in the red toolbar to the left.
- Contract Notes:
- Enter any notes regarding contract terms.
- Click the Save button in the red toolbar to the left.
- Invoice Message:
-
- Enter any event specific notes you wish to populate on the invoice.
- Click the Save button in the red toolbar to the left.
Event Notes:
- Enter any notes regarding the event. These notes will appear on internal reports only.
- Click the Save button in the red toolbar to the left.
- Setup Notes:
- Enter any special Setup notes regarding the event. These notes will appear on internal reports only.
- Click the Save button in the red toolbar to the left.
- Post Event Comments:
- Enter any notes after the event that you may want to remember if you use this event again in the future.
- Click the Save button in the red toolbar to the left.
Event Timeline Tab
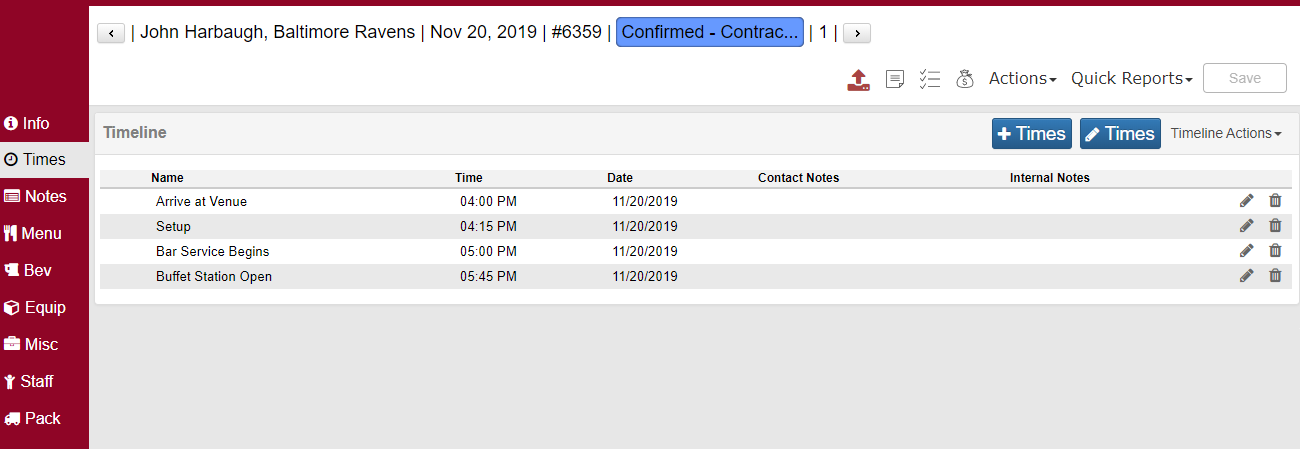
The Timeline allows you to fully customize and plan out times for your Events. Times can be selected from the drop-down list or typed directly into the box. Although times are optional, it is a good idea to always record the Event Start and End time for viewing purposes on the Calendar and Room Manager.
- Follow the Event > Full Search option from the Navigation Bar. Refer to the topic Updating Event Data for more detailed information on searching for an Event.
Helpful Hint: To quickly load the previously viewed Event, use the Event > Previously Selected option from the Navigation Bar.
- Select an Event by clicking the Invoice # link.
- Click the Times tab.
Adding Times
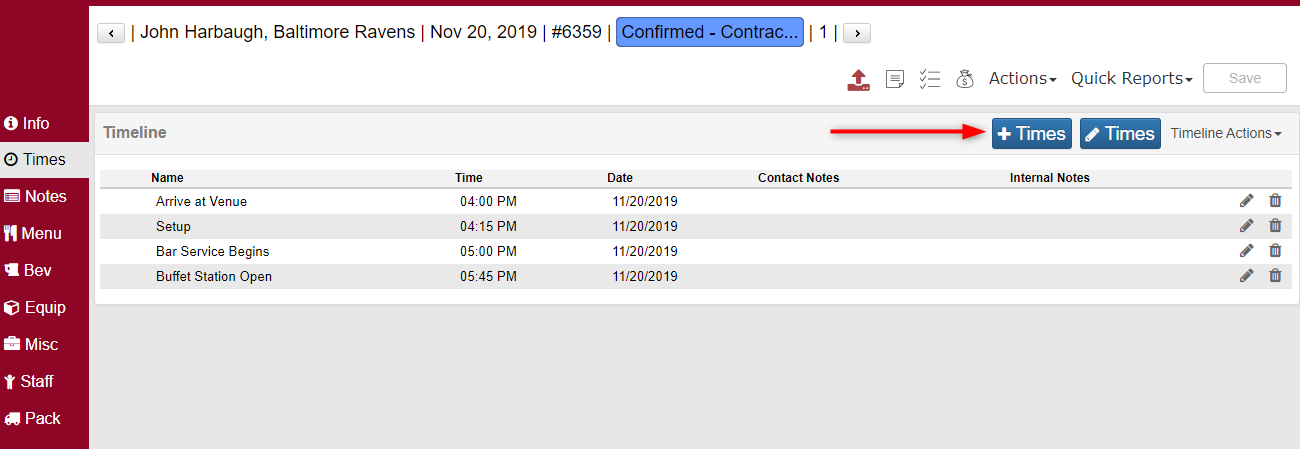
- Click the + Times button at the top right corner of the Timeline deader.

2. Check off the times you wish to be listed on your event. Click the Add New button to add a time value on the fly. Refer to the topic Times for more detailed information on updating Event times.
3. Enter in a time in the Time box, or select one from the drop-down box.
Helpful Hint: By default, the date associated to the time will be updated to the Event date. If the date is not the same (perhaps the setup date is the night before), enter the appropriate date now.
- Enter any applicable notes regarding the time. Keep in mind that Contact Notes will populate on any external reports like the Proposal and Internal Notes will populate on any internal reports like the Event Worksheet.
- Click the Add Times to Event button at the bottom right.
- When all applicable times have been added, click X at the top right.
Editing Times
For bulk updates:

- Click the Edit Times button at the top right corner
- Select the Manage Event Times tab.
- Select the time value(s) you wish to edit by checking the box(es).
- Edit the Time Value, Time, and Notes as applicable.
- To delete a time(s), simply check the times you wish to delete and select the Delete Selected button at the bottom left.
- Click the Save Changes button.
- When all applicable changes have been made, click the X at the top right.
For individual updates:
1. From the Times tab, click the ‘Edit’ icon to the right of the time you wish to edit. This icon looks like a pencil.
2. If you wish to delete a specific time, use the X icon to the right of the time.
Event Menu Tab
Event Menu Build
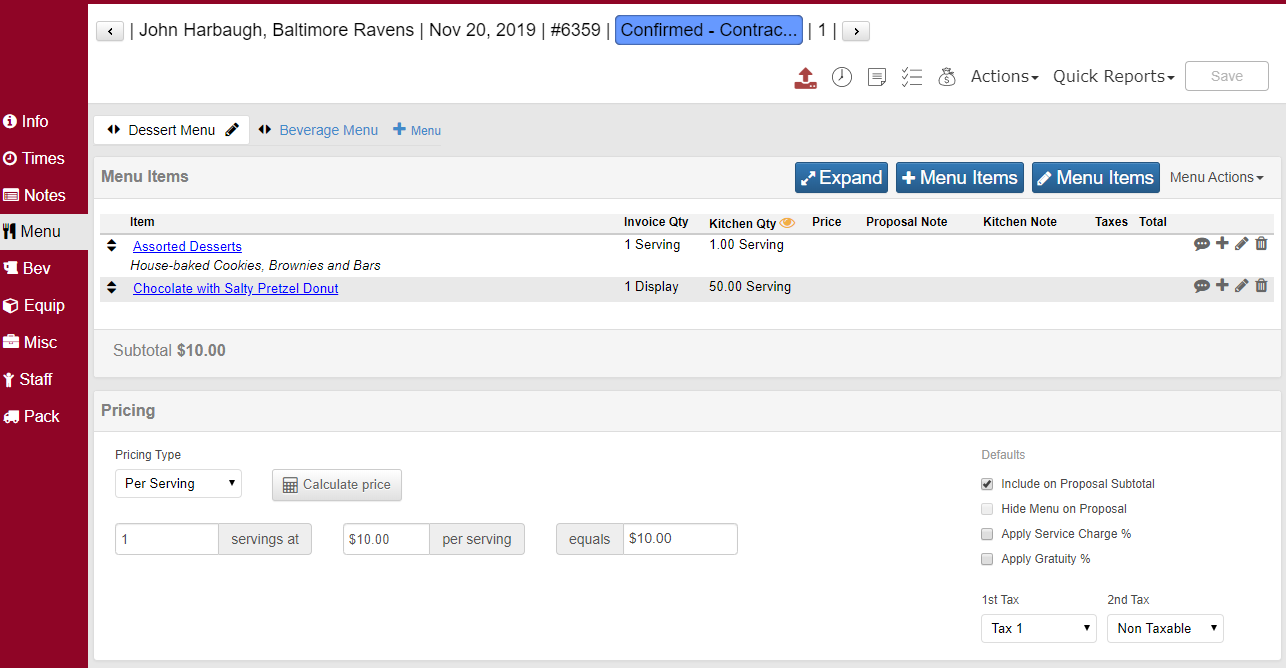
The menu window allows you to build and customize your menus for each Event.
- Select the Event > Full Search option from the Navigation Bar.
- Select the appropriate Event by clicking the Invoice # link.
Helpful Hint: To quickly load the previously viewed Event, use the Event > Previously Selected option from the Navigation Bar.
- Click the Menu #1 tab.
- Fill in what you would like the Menu Name: to be for this event and decide what you would like the menu pricing to be included in on the invoice.
- The next thing to decide when building a menu is the type of costing for that Event. There are 2 costing schemes built into the database, Per Serving Pricing and Itemized Pricing, which you can select from the Menu Pricing drop-down list.
Per Serving Pricing
Per Serving Pricing takes the number of servings you specify and multiplies by the designated price per serving. For example, 100 servings of a menu with Salad, Chicken, Beans, and a Sundae at $12.00 per serving would invoice to $1200 dollars. You can add as many food items as you wish, the cost will not change unless you change the servings or charges per serving.
Itemized Pricing
Itemized Pricing multiplies the quantity of a Menu Item by the sale price you designated for that item during its initial setup. Itemized Pricing is independent of guest count and servings. For example if your Event includes 2 Hot Italian Subs at $5.00 each, 1 Relish Tray at $15.00 each, and 3 Sodas and $0.50 each, the invoice would be for $26.50. A quantity is required for each product added.
If Per Serving is chosen:
- Enter the total number of servings in the Servings: field. Typically, this value should match the event guest count.
- Enter the Contact price per serving in the Price Per Serving field. The combination of Charges and Servings are used in calculating the Invoice.
- The Tax Menu @: drop-down list defaults to whatever you have setup as a tax rule. Change the value if required, but typically you will not change your rule. Refer to the topic Tax Rules for more information on setting up your business tax rules.
- Select a Second Tax @ from the drop down list if necessary.
- Enter in any special notes you would like the client to see in Contact Note: and any internal notes in Internal Note:.
If Itemized is chosen:
- Check or uncheck the Include in Event Total?, Service Charge?, and Gratuity appropriately.
- Enter in any special notes you would like the client to see in Contact Note: and any internal notes in Internal Note:.
- Click the Save Menu Info button in the red toolbar to the left to make any changes to the database.
6. To begin building the menu, click Manage This Menu in the red toolbar to the left. The Add Menu Items/Packages tab will be selected upon opening. Refer to the topic Selecting Event Menu Items for information on selecting menu items for your event.
Helpful Hint: See Adding a Pre-Defined Package below for information on adding pre-defined packages.
7. To review and edit the items you have currently added to the menu, select the Manage Current Menu Items tab. Select the arrow in the second column to expand the options to edit.
8. Next, if you wish to re-sequence your menu items and/or add headings to your menu, select the Re-sequence Menu Items/Add Headings. Drag and drop the menu items to achieve the order you wish. To add a heading, selected the + button to the right to add a heading above a menu item.
9. As Menu Items are added to a ‘per serving’ menu, the cost per serving gets incremented automatically to reflect your menu cost. To see this cost click the ‘Cost & Price’ tab. Refer to the topic Menu Cost Breakdown for detailed information on the costing window.
10. As food items are added to an ‘itemized’ menu, you will see the ‘Contact Price (Pre-Tax)’ increase to reflect the Menu Item charges.
Menu Sequence & Text
Refer to the topic Proposal Sequence and Additional Text for more detailed information on Proposal order and additional text.
Cost & Price
Displays a full per serving cost breakdown for the custom menu. Refer to the topic Menu Cost Breakdown for more detailed information on using this feature.
Deleting a Menu Item From Custom Menu
- From the Menu tab, click the X to the right of the menu item you wish to delete, or from Manage This Menu > Manage Current Items check the items to the left and then click Delete Selected.
- Confirm the deletion by clicking Yes.
Helpful Hint: To delete the entire menu click the Delete Menu button in the red toolbar to the left. Confirm deletion by clicking the OK button.
Selecting Event Menu Items
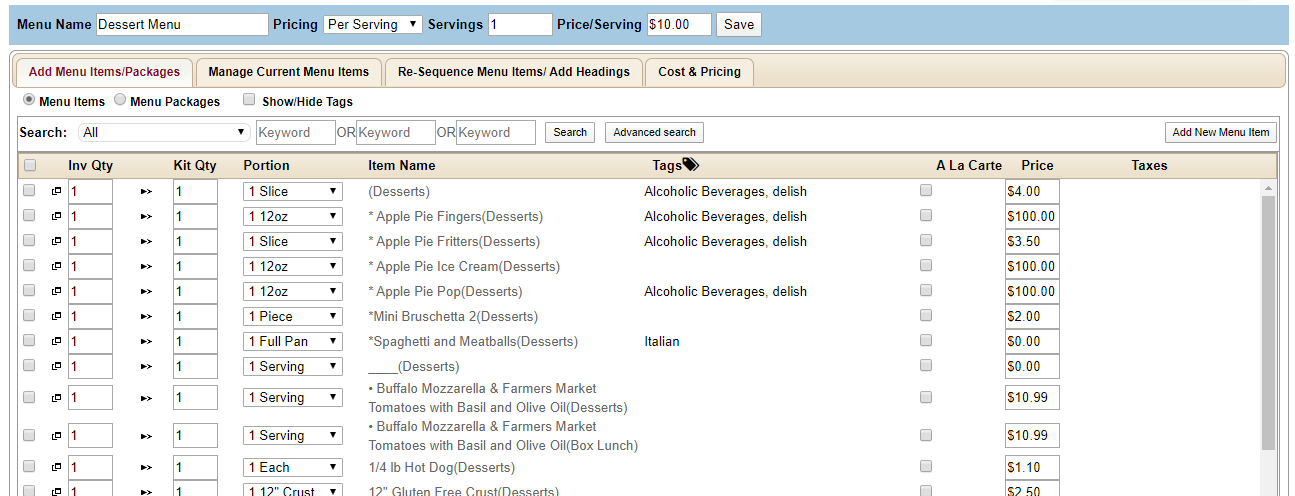
- Select the Event > Full Search option on the Navigation Bar. Helpful Hint: To quickly load the previously viewed Event, use the Event > Previously Selected option from the Navigation Bar.
- Select the appropriate Event by clicking the Invoice # link.
- Click on the Menu tab.
- Click Edit Menu Items on the right side of the Menu Items header bar, then click the Add Menu Items/Packages tab.
- Select a category from the Search: dropdown list. The available Menu Items listed under that category will appear in the list to the right.
Helpful Hint: Use the Search fields to type up to three search terms to find more than one menu item at a time.
- Check off the desired Menu Item for this menu. The item will expand to reveal more detail.
Helpful Hint: If a Menu Item that you need does not exist in the database yet, use the Create New Menu Item button. Refer to the topic Updating Menu Item Data for more information on adding a new Menu Item.
- Enter the Invoice Qty. This will be the number of units you are selling. For example, 1 sandwich, or 3 sodas. This number may also be changed after the product is added. For Per Serving Pricing, the quantity initially defaults to the guest count.
- If desired, change the Kitchen Qty. This is the amount that the kitchen reports will print, regardless of what is being invoiced. Initially it will default to the invoice quantity.
- Check the Ala-Carte? box if you wish to add the item in addition to the itemized/per serving pricing.
- Edit the Description you wish to print on the proposal. This field will automatically populate the description you added upon menu item creation.
- Select a Container from the dropdown, if needed.
- Uncheck the Show Contact? and Show Picture? options, if you wish to hide these.
- Add Contact Notes and Internal Notes to convey any extra information to your client or staff.
- Click the Add to Menu button to add the Menu Item. Continue to add all Menu Items for the Event.
- To view all items added to the menu, click the Manage Current Menu Items tab.
- Click the X button at the top right when all desired Menu Items have been added.
Multiple Menus
Total Party Planner will allow you to build multiple menus for one event. This feature allows you the flexibility to offer different menus charged at different prices. A Per Serving Pricing example, for an event with a total guest count of 150 and the following menus could be:
- Menu 1: Per Serving Price = $12.00
Salad, Chicken, Beans, Sundae - Menu 2: Per Serving Price = $18.00
Salad, Filet, Au Gratin, Sundae
If 100 guests choose Menu 1 and 50 guests choose Menu 2 you would want each menu to be itemized on the invoice. Creating multiple menus allows you to do that. You can create as many menus as you wish. Be sure to change the servings and cost of each menu as you build them.
- Build the first menu as explained above in the Event Menu topic.
- Click the New Menu button on the red toolbar to the left to add an extra menu subtab.
- Build the second menu as the first.
Helpful Hint: If each menu differs only slightly, you may click the Copy As New Menu button in the red toolbar to the left to copy the previous menu and make the necessary modifications.
- Click the appropriate menu tab to go back to preceding menus.
Sequencing Menus
Follow these steps to Re-Sequence Menu Items and/or add menu headings.
-
- Select the Event > Full Search option on the Navigation Bar. Helpful Hint: To quickly load the previously viewed Event, use the Event > Previously Selected option from the Navigation Bar.
- Select the appropriate Event by clicking the Invoice # link.
- Click on the Menu tab.
- Click Edit Menu Items on the right side of the Menu Items header bar, then click the Re-Sequence Menu Items/Add Headings tab.
- Left-click and hold down the Double Arrow icon to the left of the menu item name and drag the item to re-sequence the menu items in the desired order.
- Optionally, you can quickly move an item to the top of the sequence by clicking Move to Top.

Editing an Event Menu Item Row
- Select the Event > Full Search option from the Navigation Bar.
- Select the appropriate Event by clicking the Invoice # link.
Helpful Hint: To quickly load the previously viewed Event, use the Event > Previously Selected option from the Navigation Bar.
- Click on the appropriate Menu tab.
- From the custom menu grid, you will see a series of icons to the right of each items. Their actions are as follows(from left to right):
- The first icon, which looks like a dialogue bubble, allows you to insert a Menu Heading from the Event Menu Tab. The Menu Heading will insert itself directly above the item associated with the icon you clicked.
- The second icon, which looks like a plus sign, will allow you to insert one menu item. When clicked, a predictive search screen populates for you to find the appropriate menu item.
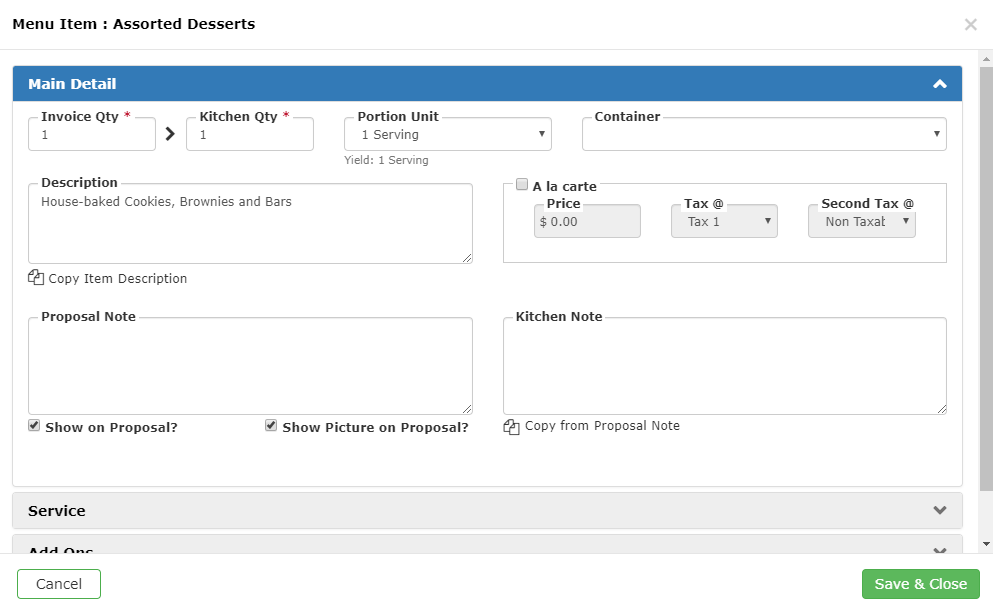
- The third icon, which looks like a pencil, will allow you to edit individual menu items. Edit the following options:

-
- Invoice Qty: Update the invoice quantity as applicable.
- Kitchen Qty: The kitchen quantity may be different than the invoice quantity. By default they start out equal.
- Show Contact?: If you would like the client to see the individual menu item.
- Picture on Proposal?: If you would like a photo associated with the menu item to be displayed on the proposal.
- Ala-Carte?: Ala-Carte items are cost separately on the invoice (in addition to the per serving price). Check the Ala-Carte check box. The Price field will become visible. The default price you see was setup in the Menu Item module. Edit the price if necessary. Editing the price is for this Event only. After clicking Save the first column in the menu grid will change from No to Yes and highlighted yellow.
Note: This option is available on Per Serving Pricing only.
o Container: Select a container for the drop-down list. If you would like to add a new container not already in the database, select Add New Container from the drop-down list. A box will pop-up that will allow you to enter the container name.’
o Tax At: For items marked as ala-carte, the Tax At: drop-down list defaults to whatever you have setup as a tax rule. Change the value if required, but typically you will not change your rule. Optionally, you may enter a Second Tax@. Refer to the topic Tax Rules for more information on setting up your business tax rules.
-
- Contact Report Note: A note typed here will appear on the Proposal of Service for this menu item.
- Internal Report Note: A note typed here will appear on the Event Worksheet for this menu item.
- Add-Ons: There may be instances where you want to combine two of your Menu Items together without having to create a Menu Item for the combination. One example might be as follows:
Main Menu Item: Chef Salad; Add-On: Bleu cheese dressing
-
-
- Click in the Add or Update Add-Ons button. The Menu Item Selection window appears. Select your Menu Item as you did when building the menu.
- Click the Currently Selected Add-Ons tab to view Add-Ons that have been selected.
- Click the Back to Menu Item button.
- Click the ‘Save’ button. The new data will be reflected in the grid. Clicking ‘Cancel’ will close the window without applying any of the changes.
-
- The forth icon will delete the associated menu item or heading from your event.
Adding a Menu Item Package
Adding a Pre-defined Package
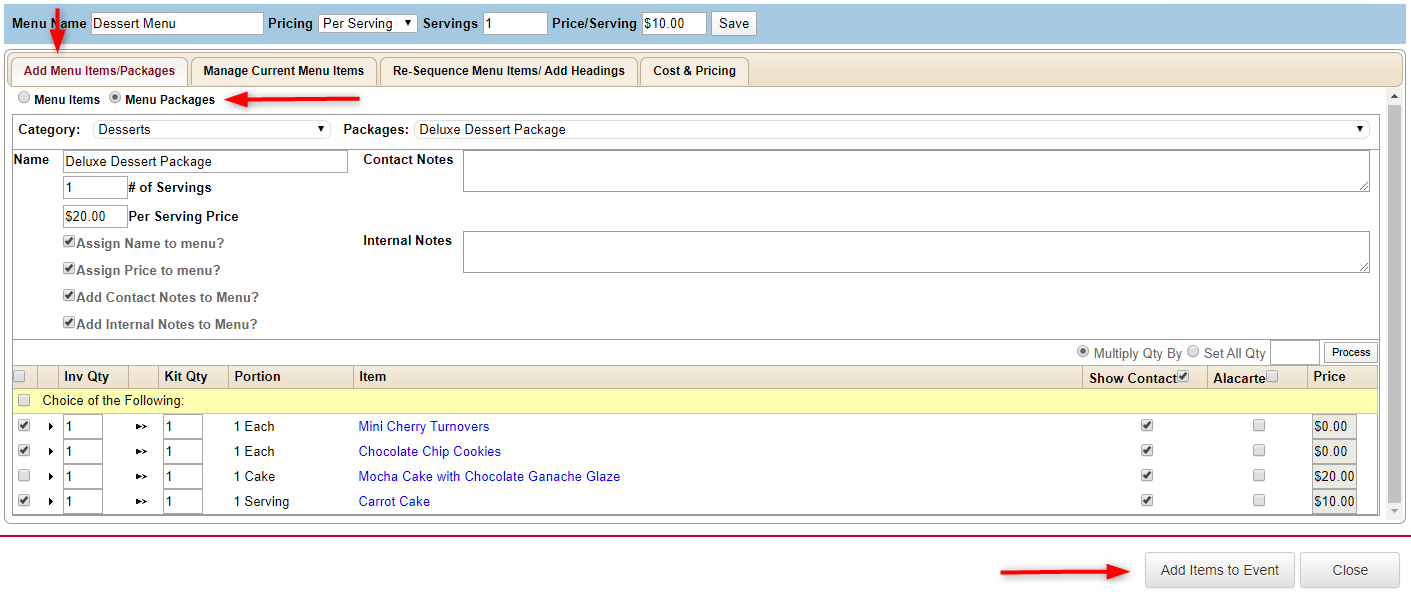
- Under the appropriate Menu tab, click + Menu Items.
- Select the Add Menu Items/Packages Tab.
- Select the Menu Packages option.
- Select a package Category: from the drop-down list.
- Select the desired package from the Search: drop-down list.
- Uncheck the Assign name to menu? or Assign price to menu? options if you do not wish to use the package name or price to the menu. These boxes are checked by default.
- Edit the quantity column directly in grid to the correct numbers for the Event. The default value is the guest count.
- Click the Add Items to Event button.
Beverages Tab
Total Party Planner allows you to add beverage items to your event and select the proper amounts to order & purchase. The ‘Beverages’ tab is just one of the ways to add beverage items into Total Party Planner. It is suggested to use this method only if you want to be very specific as to the type of beverages requested and amount used/sold. This method gives you the most precise, detailed cost analysis.

Other methods to include beverages for an Event are:
- Adding a Menu Item defined as a beverage
- Adding a Miscellaneous item defined as a beverage.
The flexibility is there for you. Experimenting with the 3 methods will help determine the most effective process for your business.
- Select the Event > Full Search option from the Navigation Bar.
- Select the appropriate Event by clicking the Invoice # link.
Helpful Hint: To quickly load the previously viewed Event, use the Event > Previously Selected option from the Navigation Bar.
- Click on the Beverages tab.
Adding Event Beverage Items
1. Contact Report Note: You may add special contact notes for the proposal. This is a great way to communicate generic notes regarding the beverage(s).
2. Internal Report Note: You may add special contact notes for internal reports.
3. Enter in or edit any special notes and click the Save button in the toolbar to the left.
4. Click + Beverages from the Beverages header bar. The Manage Beverages dialogue appears. Click Search to populate your beverage database.

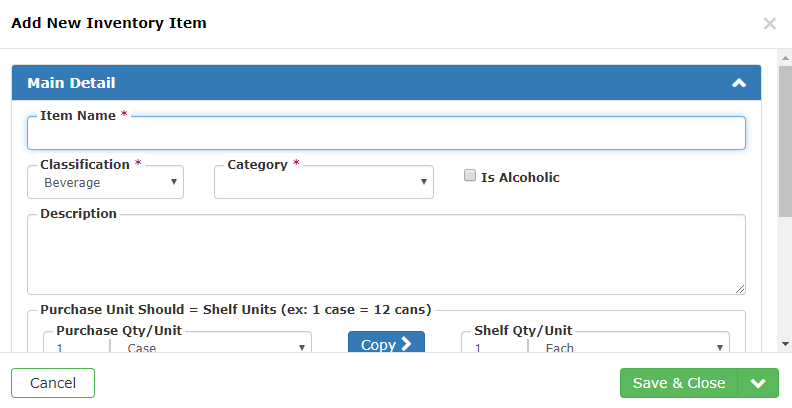
5. Select an item from the Available Beverage Item list. To narrow down the selection list select a category from the Category: drop-down list or use the Search boxes. If a beverage item you want has not yet been added to the database, you can add it now by clicking on the Add New Beverage Item button. Refer to the topic Updating Inventory Data for more detailed information on adding inventory.
-
- Event Amt: Enter the quantity required for this Event.
- Gst Cnt?: If this box is checked, your rentals will automatically update if the Guest Count is ever changed.
- Invoice?: If this box is checked, the contact is charged on the invoice. Otherwise it is only cost internally.
- Price: The price you will charge the client for the rental.
- Cost: The price you paid for the rental. If you own the item, it will most likely be $0.
- Vendor: Select an appropriate Vendor from the drop down list.
- Description: Edit this item’s marketing description
- Scv Chrg?: Select this option to include the item’s cost in the Service Charge calculation.
- Gratuity?: Select this option to include the item’s cost in the Gratuity calculation.
- Contact Notes: Any item specific notes you wish to populate on the Proposal for the client.
- Internal Notes: Any item specific notes you wish to populate on internal reports, like the Event Worksheet.
- Click the Add to Event button.
- Click the Manage Current Beverage Items tab to view and edit selected beverages.
- When all applicable Beverages have been added to the Event, click the X button at the top right corner of the dialogue.
Re-sequence the way beverage items appear on proposals

- Click the Re-Sequence Beverage Items tab within the Manage Beverage dialogue.
- Drag and drop the items until they are in the desired order.
- If you wish to add headings to the beverage section on the proposal, click the text bubble icon to the right of the item.
- Type desired text in the Text to be Inserted frame. Examples of text might be ‘Fine Wines’, or ‘Freshly Squeezed Juices’, etc.
- Click ‘Update’ to save changes.
- Click the ‘X’ at the top right corner of the dialogue once you are finished making the necessary edits.
Beverages to Order
Use this feature to view amounts of Beverages and Rentals in stock and amounts to order for that Event day.
- In the Manage Beverages dialogue, click the Beverages To Order tab.
- The list of Beverages for the Events on that day will be listed. To update in stock amounts, refer to ‘Editing an Inventory Item’ under the topic Updating Inventory Data.
- Click the X at the top right corner of the dialogue once you are finished making the necessary edits.
Deleting Event Beverage Items


- Under the Beverages tab, click X icon to the right of the appropriate beverage. Click the OK button to confirm the deletion.
- Use the Delete All Beverages option in the toolbar to the left to delete ALL beverage items.
- Click the OK button to confirm the deletion.
Beverage or Rental Packages
For more information refer to the topic Beverage and Rental Packages.
Equipment Tab
Adding rental items to an Event is very similar to adding a rental. Rental items are created as Inventory with a classification of Equipment or Other. Optionally you choose whether or not to invoice these items to the Contact, or simply track them internally for an Event.

- Select the Event > Full Search option from the Navigation Bar.
Helpful Hint: To quickly load the previously viewed Event, use the Event > Previously Selected option from the Navigation Bar.
- Select the appropriate Event by clicking the Invoice # link.
- Click on the Rentals tab.
Adding Event Rental Items
Contact Report Notes: You may add customized Contact Report Notes for the proposal. This is a great way to communicate generic notes regarding the rentals.
Internal Report Notes: You may add customized Internal Report Notes for internal reports. This is a great way to communicate generic notes regarding the rentals.

- Click + Rentals from the Equipment header bar. The Manage Rentals page appears.
- Click the Search button to populate your beverage inventory items. Select an item from the grid. To narrow down the selection list select a category from the Category: drop-down list and or use the ‘Search:’ bars. If a rental item you want has not yet been added to the database, you can add it now by clicking on the ‘Add New Rental Item’ button. Refer to the topic Updating Inventory Data for more detailed information on adding inventory.
-
- Event Amt: Enter the quantity required for this Event.
- Gst Cnt?: If this box is checked, your rentals will automatically update if the Guest Count is ever changed.
- Invoice?: If this box is checked, the contact is charged on the invoice. Otherwise it is only cost internally.
- Price: The price you will charge the client for the rental.
- Cost: The price you paid for the rental. If you own the item, it will most likely be $0.
- Vendor: Select an appropriate Vendor from the drop down list.
- Description: Edit this item’s marketing description
- Scv Chrg?: Select this option to include the item’s cost in the Service Charge calculation.
- Gratuity?: Select this option to include the item’s cost in the Gratuity calculation.
- Contact Notes: Any item specific notes you wish to populate on the Proposal for the client.
- Internal Notes: Any item specific notes you wish to populate on internal reports, like the Event Worksheet.
3. Click the Add to Event button.
4. You may view and edit selected inventory items by clicking on the Manage Current Rental Items tab.
5. When all applicable Rentals have been added to the Event, click the Back to Event button.
Re-sequence the way rental items appear on proposals.

- Click the Re-Sequence Rental Items tab within the Manage Rentals dialogue.
- Drag and drop the items until they are in the desired order.
- If you wish to add headings to the rental section on the proposal, click the text bubble icon to the right of the item.
- Type desired text in the Text to be Inserted frame.
- Click Update to save changes.
- Click the X at the top right corner of the dialogue once you are finished making the necessary edits.
Rentals To Order
Use this feature to view amounts of Beverages and Rentals in stock and amounts to order for that Event day.
- In the Manage Rentals dialogue, click the Rentals To Order tab.
- The list of Rentals for the Events on that day will be listed. To update in stock amounts, refer to ‘Editing an Inventory Item’ under the topic Updating Inventory Data.
- Click the X at the top right corner of the dialogue once you are finished making the necessary edits.
Deleting Event Rental Items
- Under the Rentals tab, click the X icon associated with the appropriate rental item. You will be asked to confirm the deletion.
- Under the Manage Rentals>Manage Current Rental Items tab, select the appropriate rental item, and click the Remove From Event button.
- Use the Delete All Rentals hyperlink to delete ALL rental items.
- You will be asked to confirm the deletion.
Misc. Tab
Miscellaneous items are additional items that you charge the Contact for, not included in the menu, beverage, or rental costs. Refer to the topic Updating Miscellaneous Data for further information on creating Miscellaneous items.
- Select the Event > Full Search option from the Navigation Bar. Refer to ‘Searching for a Miscellaneous Item’ under the topic Updating Miscellaneous Data for more detailed information on searching for a miscellaneous item.
Helpful Hint: To quickly load the previously viewed Event, use the Event > Previously Selected option from the Navigation Bar.
- Select the appropriate event by clicking Invoice #.
- Click on the Misc. tab.
Adding Miscellaneous Items
Contact Report Notes: You may add customized Contact Report Notes for the proposal. This is a great way to communicate generic notes regarding the miscellaneous items.
Internal Report Notes: You may add customized Internal Report Notes for internal reports. This is a great way to communicate generic notes regarding the miscellaneous items.
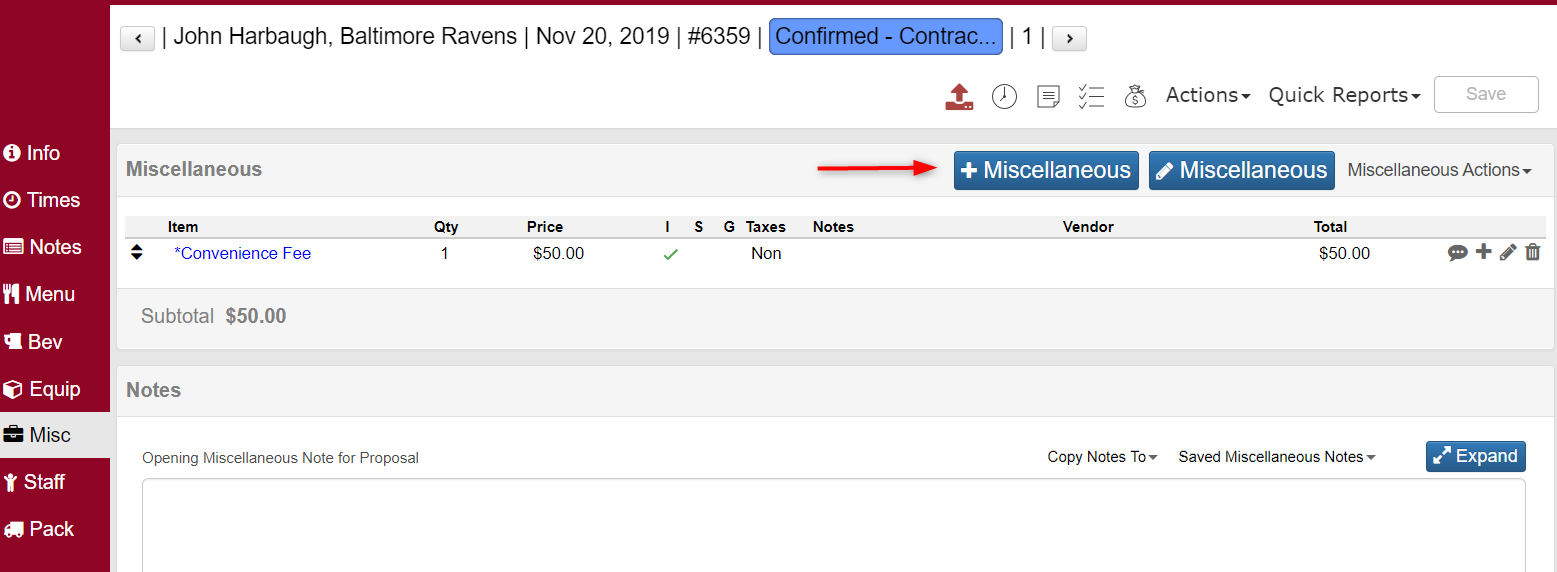
- Click the + Miscellaneous option in the Miscellaneous header bar. The Manage Miscellaneous page appears.
- Select an item from the grid. To narrow down the selection list select a category from the Category: drop-down list and Search: bars. If a miscellaneous item you want has not yet been added to the database, you can add it now by clicking on the Create New Miscellaneous Item button. Refer to the topic Updating Inventory Data for more detailed information on adding inventory.
Helpful Hint: To further aid in your selection, Total Party Planner allows you to type in the first few characters of the item name in the Search box. The list will automatically advance to items that begin with the entered characters.
- Use the checkbox next to the Miscellaneous item to select it.
- Event Amt., Hour: After selecting the desired item from the grid, you may be prompted to enter the total amount of the item or the hours associated with the item. If an items unit is ‘Each’, then a valid quantity must be entered for the item. If the item is priced as Per Hour then you must also enter the total hours for this item.
- Gst Cnt?: Select this box if you wish to default the event amount to the guest count.
- Invoiced?: If this box is checked, the contact is charged on the invoice. Otherwise it is only used internally for the Event. Helpful Hint: If a Menu Item that you need does not exist in the database yet, use the ‘Quick Add Miscellaneous’ button. Refer to the topic Updating Miscellaneous Data for more information on adding a new Miscellaneous Item.
- Price: The price you will charge the client for the item.
- Cost: The price you paid for the item. If you own the item, it will most likely be $0.
- Vendor: Use the drop-down box to select the appropriate Vendor for the Miscellaneous Item. Refer to the topic Vendors for more information on adding a new Vendor.
- Description: Enter a brief description of the item.
- Contact Notes: You may add customized Contact Report Notes for the proposal. This is a great way to communicate generic notes regarding the miscellaneous items.
- Internal Notes: You may add customized Internal Report Notes for internal reports. This is a great way to communicate generic notes regarding the miscellaneous items.
- Service Charge?: If this box is checked, this item will be added to the Service Charge if applicable.
- Gratuity?: If this box is checked, the item will be added to the Gratuity if applicable.
- Click the Add to Event button.
- Repeat the above steps for all Miscellaneous items required for the Event.
- To view items added to the Event, click the Manage Current Misc. Items tab.
- When all applicable Miscellaneous items have been added, click the ‘X’ button at the top right of the dialogue.
Editing Event Miscellaneous Selections
- Select the Event > Full Search option on the Navigation Bar. Refer to the topic Event Selection for more detailed information on searching for an Event.
Helpful Hint: To quickly load the previously viewed Event, use the Event > Previously Selected option from the Navigation Bar.
- Select the appropriate Event by clicking the Invoice #.
- Click the Misc. tab.
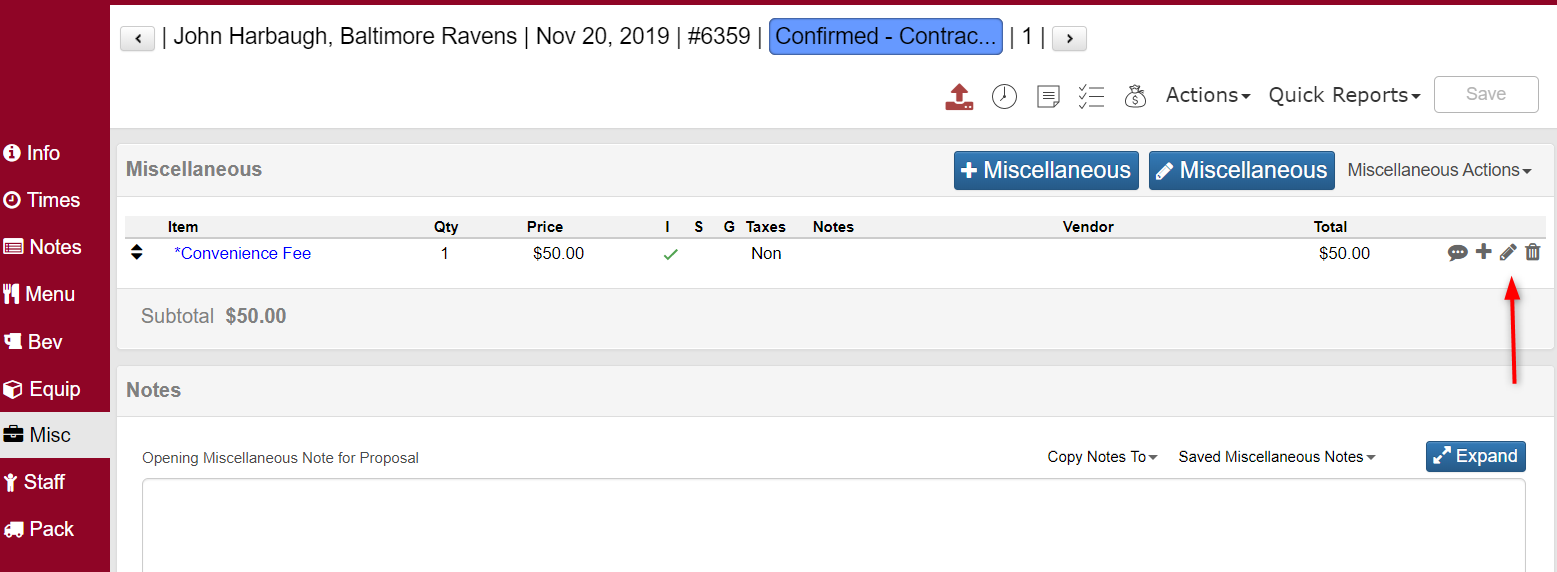
- Select the Miscellaneous item to be edited from the grid by clicking the pencil icon associated to the right.
- The Event Amount, Hours, Sale Price, Unit Cost, Invoice?, Svc Chrg?, Gratuity?, Picture on Proposal?, Vendor, BEO, Assign Area, Description, and Notes fields may be adjusted accordingly. The Tax At: drop-down list defaults to whatever you have setup as a tax rule. Change the value if required, but typically you will not change your rule. Refer to the topic Tax Rules for more information on setting up your business tax rules.
- Click the Save Button to save the data to the database or click Cancel to rollback any changes
Proposal Sequence & Headings
Re-sequence the way miscellaneous items appear on proposals.

- Click the Edit Miscellaneous button to bring up the Manage Miscellaneous items dialog.
- Select the Re-Sequence Misc Items tab.
- Drag and drop the items until they are in the desired order.
- Click the Back to Event button.
Add headings to organize items on proposals.
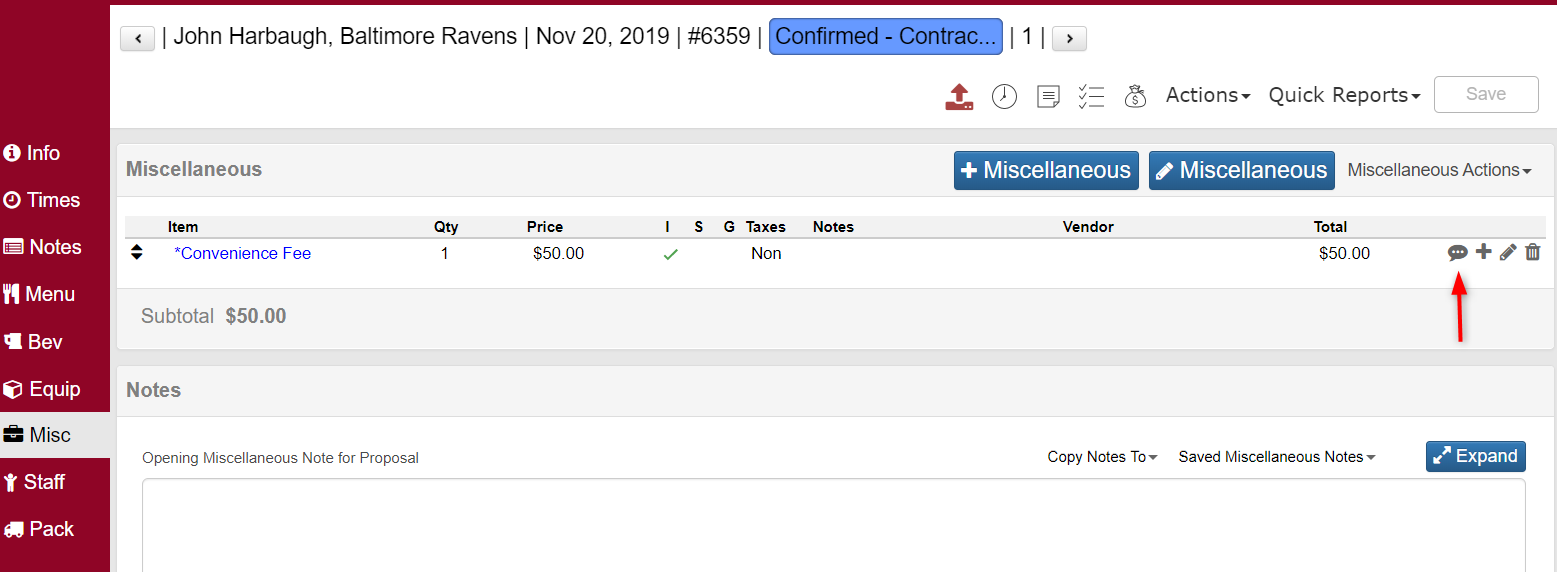
1. Click the ‘+’ icon to the left of the item you wish to insert the heading above.
- Type desired text in the Text to be Inserted frame. Examples of text might be ‘Flowers’, or ‘DJ Service’, etc.
a. Helpful Hint: Use the ‘Headings’ drop-down list to setup standard phrases you will use over and over. Choose the Add New Heading from the drop-down list to create the text values. Refer to the topic Standard Messages for more detailed information.
- Click Update to save changes.
- Click the X button on the top right corner of the dialogue when finished making changes.
Deleting Miscellaneous Items
- Search for the item from the Misc. > Full Search grid on the Navigation Bar. Click the Delete link next to the appropriate miscellaneous item. Confirm the deletion by clicking Yes.
- Under the Miscellaneous tab on the Event level, click the X icon in the appropriate miscellaneous item box. Confirm the deletion by clicking OK.
- Use the Delete All Miscellaneous hyperlink to delete ALL miscellaneous items. You will be asked to confirm the deletion.
- Under the Manage Current Misc Items tab, click the X icon associated with the appropriate miscellaneous item box. Confirm the deletion by clicking OK.
Hire Staff Tab
Total Party Planner allows you to select which Staff members will work a particular event and to assign them specific job duties for that event. Wages and Contact charges (if invoiced) associated to the hired title for the employee will be calculated automatically for view in the financial module and invoice.
Step 1 — Select an Event to Add Staff
- Select the Event > Full Search option from the Navigation Bar.
- Helpful Hint: To quickly load the previously viewed Event, use the Event > Previously Selected option from the Navigation Bar.
- Narrow the Events displayed in the grid by changing the elements in the search box to match your search and clicking the Search button. Refer to the topic Updating Event Data for more detailed information on searching for an Event.
- Click the Invoice # link on the event you would like to add the Staff member to.
- Click on the Staff tab.
Step 2 — Adding Staff to an Event
Contact Report Notes: You may add customized Contact Report Notes for the proposal. This is a great way to communicate generic notes regarding the rentals.
Internal Report Notes: You may add customized Internal Report Notes for internal reports. This is a great way to communicate generic notes regarding the rentals.
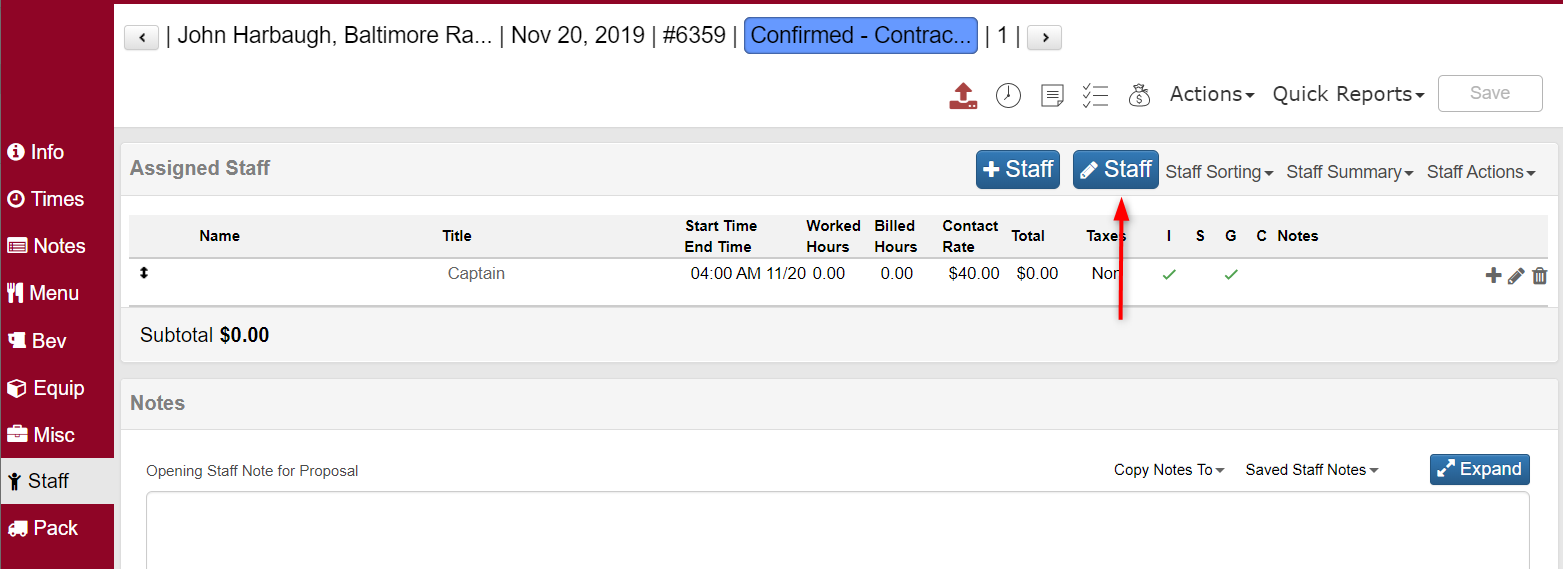
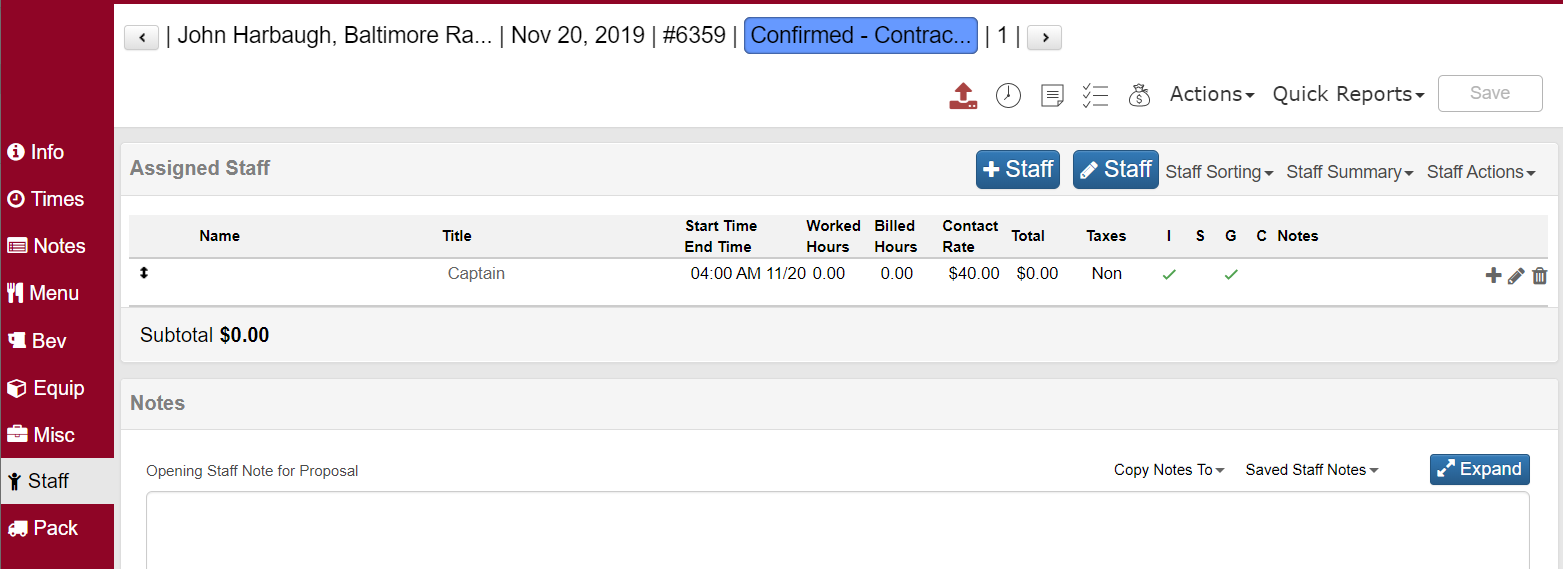
- Click the Edit Staff link.
- Choose a Staff Title from the Staff Title drop-down list.
- Option #1: Hire the title only (no staff member). For billing purposes you may want to simply hire a title and a quantity (ex: 6 wait staff and 2 bartenders). In this case enter the desired Quantity: in the text box.
- Option #2: Hire a specific staff member. All Staff member who match that job title appear in the Active Staff to Hire: window. Inactive employees do not appear. Refer to the topic Updating Staff Data to build a job title, wages and then assigning them to employees. Optionally you can select a specific staff member for the selected title from the Staff Member drop-down list.
- If you wish to hire more than one of a single staff title, apply the appropriate Qty.
- Optionally, select the appropriate arrival and departure time from the Scheduled Arrival and Scheduled Departure drop-down lists, or you may enter in the times manually.
- Select the Bill Flat Rate if you would like to ignore the hours and bill the contact at a flat rate. This contact the contact the price you set for the title, regardless of hours billed.
- If this staff member is to be invoiced (see option below), the Billed Hours are the number of hours the contact will be billed for.
- Enter in the amount you wish to charge the contact in the Contact Rate field.
- The Calculate button is used if you would like to automatically have the billed hours to match the scheduled hours.
- Select the Pay Flat Rate if you would like to ignore the hours and pay the employee at a flat rate.
- Pay Hours & Pay Rate are the wage and number of hours the staff member will be paid for. Use this as a shortcut to entering the scheduled arrival and departure times.
Helpful Hint: Modifying the wage for the Staff member will only be effective for that particular Event.
- Specific Staff Notes: Any additional notes regarding the staff member.
- Invoice? If this staff title should be invoiced to the contact, check the checkbox. The invoiced hours will equal the scheduled hours; however, you may adjust the contact billed hours accordingly.
- Service Charge? If you would like to apply a service charge along with the staff member.
- Gratuity? If you would like to include gratuity in the proposal for the staff member.
- Confirmed? If the staff member is confirmed to work check this box.
- Click the Hire Title or Staff Member button.
- You may view selected staff members by clicking on the Manage Current Staff tab.
- When all applicable staff members have been added to the Event, click the X button at the top right.
Step 3 — Deleting Event Staff
- Click on the Hire Staff tab.
- Click the X icon in the appropriate staff member box. You will be asked to confirm the deletion.
OR
- From Manage Staff, you may click the Manage Current Staff tab to view the staff currently assigned to the Event.
- To remove any staff from the Event, select the checkbox for the staff you would like to remove.
- Click the Remove Selected button.
- Click the X button at the top right to go back to viewing the event.
Step 4 — Editing Event Staff Data
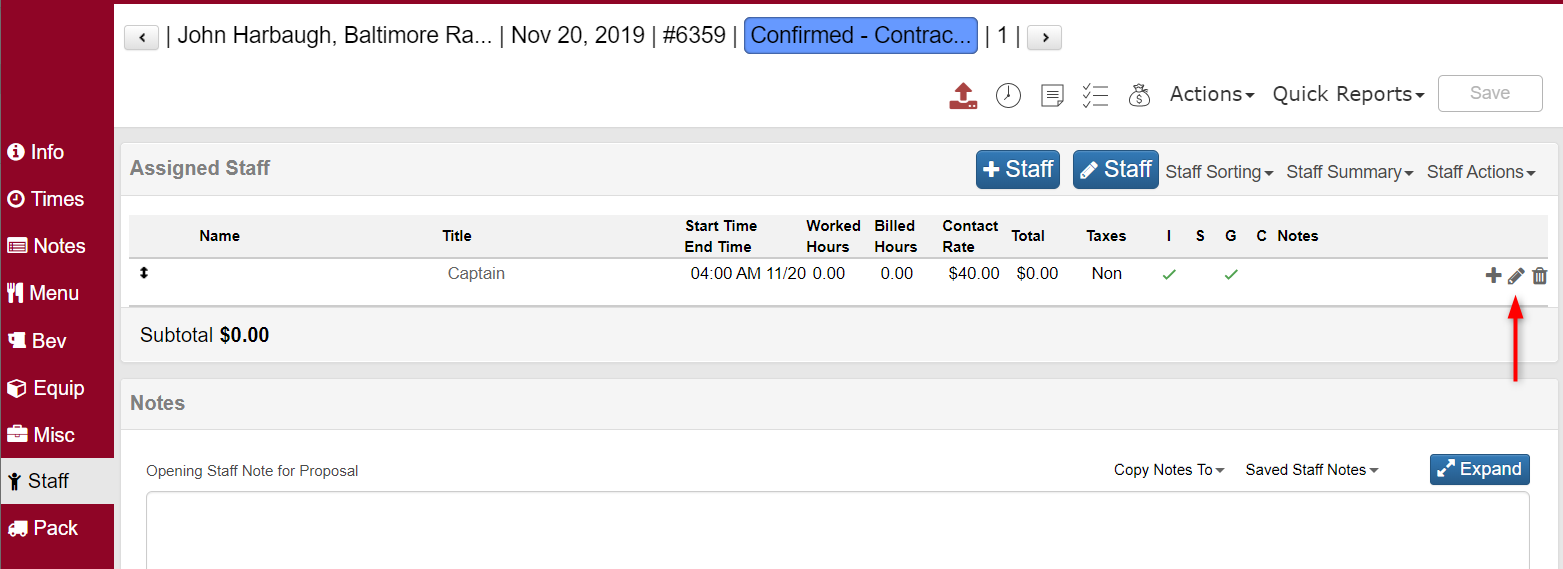
- From the Event view screen, click the Staff tab.
- Click the pencil icon on the staff member you wish to edit data for.
- Refer to Step 2 above for more detailed information on editing Staff.
- Click the Save button, or Cancel to rollback any changes.
