The Calendar lists all of your company events and gives you summary information for each one. You can adjust the filters to remove events from the calendar view that you do not need to see (Cancelled events for example) and many other options to customize the view.
Filters (Month and Week Views)
To change what appears on your Calendar view, you will want to adjust the filters.
First, make sure your filter menu is showing by clicking the Show Filters button:

Once you have confirmed that Show Filters is activated then you can now decide what you want to appear on your calendar.

Filter Options
- Status: Choose what events appear based on their assigned Status
- Opportunity Status: Choose what Opportunities appear based on their assigned Status
- Note: Display Opportunities must be checked in the Display Options
- Event Type: Choose what events appear based on their assigned Event Type
- Service Style: Choose what events appear based on their assigned Service Style
- Salesperson: Choose what events appear based on their assigned Salesperson
- Venue: Choose what events appear based on their assigned Venue
- Premise: Choose what events appear based on their assigned status between On or Off Premise
Display Options
- Event Display: Choose what basic info will appear in the calendar for each event
- Week Starts On: Choose what day of the week your calendar starts
- Display Appointments: Add/Remove appointments from your view
- Display Opportunities: Add/Remove Contact and Lead opportunities from your view
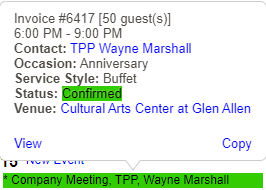
- Display Hover Over: Shows a pop-up window with more event information when you hover your mouse over the event on the calendar
- See example below
Other Menu Options
- Print Calendar: Print a paper copy of the month view
- Room Manager: Quick click to open the Room Manager
- Block Day: Block days to prevent any new events from being added
- Select the desired day to block
- Click the Block Day button
- Enter the reason that the day is blocked and click OK
- The date on the calendar will turn yellow
- A warning will now appear if you try to create any new Events for this date
- It is fine to block a date that already has Events scheduled to prevent overbooking
- To unblock a date, click the Unblock Date button that will now appear in the place of the Block Day button and follow the steps
- Today: Quick click to go to the current month and date on the calendar
- Week View: Quick click to go to the Week View of the calendar