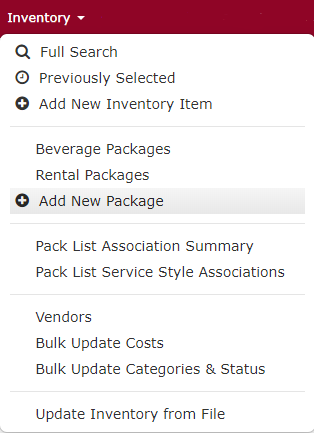
Package functionality allows you to combine a pre-set group of inventory items into a bundle for quick addition on an Event. You can create packages for beverages and for rentals.
Adding a Package
From the Red Navigation Bar select Inventory > Packages > Add New Package.
Required Fields
- Item Name: Enter the name of the new package.
- Package Class: Define whether it is a Beverage or Rental package.
- Cost Type: Decide how you want to charge for the package.
- Each: Sale Price x the Item Qty sold.
- Per Drink*: Essentially the same as Each.
- Per Hour: Charge by the hour, regardless of the number of drinks served.
- Per Person: Charge by the person, regardless of the number of drinks served.
- Per Person Per Drink*: Charge by the guest count times a certain number of drinks.
- Example: 100 Guests x 3 Drinks each = 300 x Sale Price
- Per Person Per Hour: Charge by guest count times a number of hours.
- Example: 100 Guests x 3 Hours = 300 x Sale Price
*Beverage Package option only
Optional Fields
- Category: Assign to a specific category.
- Sale Price: How much you charge your client for the package.
- Actual Cost: Your cost to obtain this from your vendor.
- Description: Enter in a description of the package.
- Vendor: Add the name of the Vendor you obtain the items in the package from.
- Tax Scheme: Assign how your Tax Rules apply to this item when sold.
- Tax Exempt Scheme: Assign how this item is/isn’t taxed if the event is marked as Tax Exempt.
- Second Tax Scheme: Assign a second Tax Rule to the item when it is sold.
- 2nd Tax Exempt Scheme: Assign how this item is/isn’t taxed if the event is marked as Tax Exempt.
- Include in Service Charge?: Define whether this item is charged against an overall Service Charge applied to an event.
- Example: Maybe your company charges an 18% Service Charge on all Food & Beverage. If this is a Beverage Package then you would want to check this box to ensure the 18% is calculated against the package sale price.
- Include in Gratuity?: Define whether this item is charged against an overall Gratuity percentage applied to the event.
- Accounting Code: This field is filled automatically when you integrate with Quickbooks.
Click the Save button to create the package in your database.
Searching Packages
From the Red Navigation Bar select Inventory > Beverage Packages or Rental Packages.
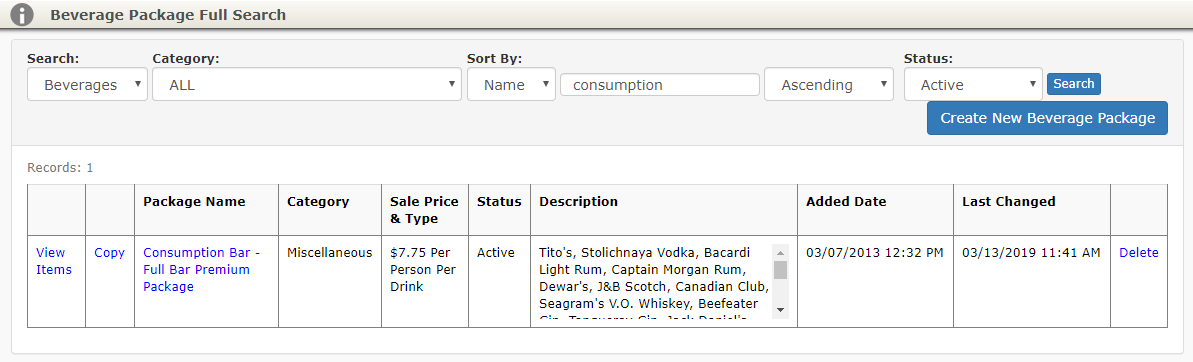
Filter Results
You will see a list of all your current packages in the database.

Filter these result with the following options:
- Search: Drop down to toggle between Beverages and Rentals packages.
- Category: Filter by specific package categories.
- Sort By: See your results sorted by either Name or Price
- Blank Search Field: Enter a keyword to search for a specific Package Name.
- In this example we have searched for Beverage Packages with the word Consumption in the name.
- Sort Order: Sort your search results by Ascending or Descending order
- Status: Search Active or Discontinued Packages or search both by selecting All.
Editing a Package
When you have found the package you want to edit, you have a few options available (blue hyperlinks).

View Items

Takes you directly to edit the items included in the package.
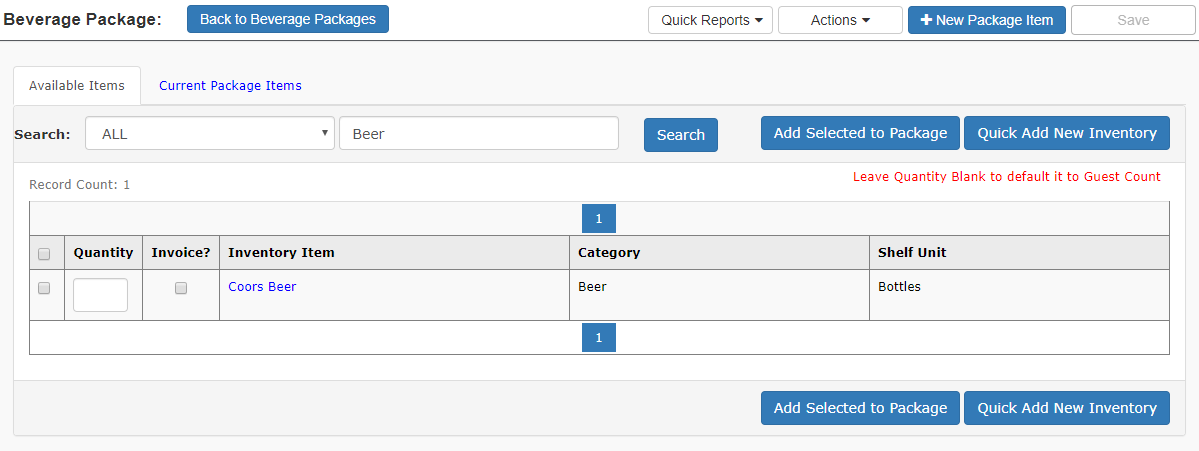
- Available Items are items in your database that can be added to your package.
-
- Quantity: Enter a specific amount or leave the Quantity field blank to default to guest count.
- Invoice: Choose whether the items is charged spearately from the overall package cost by checking the Invoice box.
- Add Selected to Package: Check the box in the first column next to items you want to add and then click this button to add them.
- Quick Add New Inventory: Quickly add new individual items to your inventory database so that you can include them in the package.
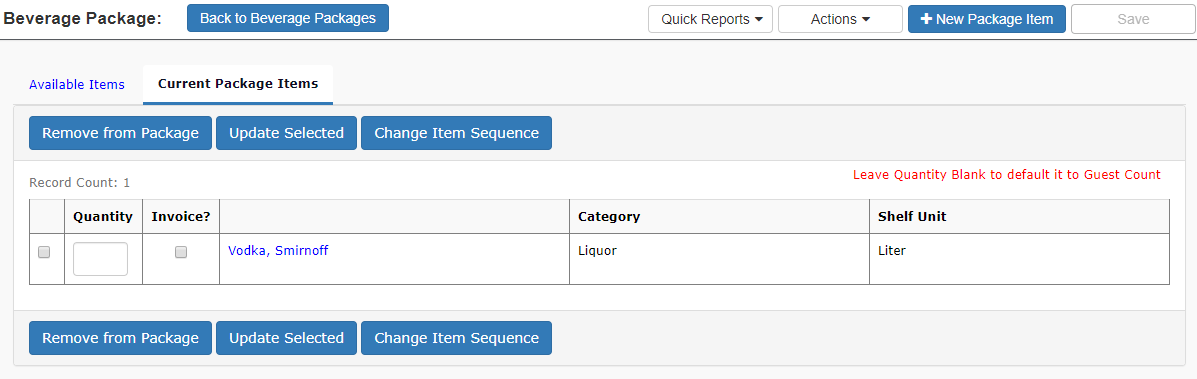
- Current Package Items are items that are currently assigned to the package you are viewing.
- Remove from Package: Check the box in the first column next to items to remove and then click this button to do so.
- Update Selected: Change the Quantity or Invoice? indicator and click this button to update.
- Change Item Sequence: This will take you to a screen that allows you to change the order the items appear in the package by dragging and dropping them.
- You may also add headers here or delete items.

Copy

Make a Copy of the existing package. This is a great way to easily create variations of a package without having to start from scratch.
Package Name

Click the Package Name to go to the package View.
Delete

Delete the package from your database.
Packages may only be deleted if they have not been added to an event. Packages that cannot be deleted can be marked as Discontinued.
If a package is Discontinued, it will remain on any events that it was added to before it was marked as such, but cannot be added to newly created events moving forward.