Before an event can be created for a contact, their information must be entered in your TPP database.
That information only needs to be entered in once.
The contact will remain in the database to be used with future events and to refer to regarding previous events.
Adding a New Contact
Select the Contact > Add New Contact option from the navigation bar.
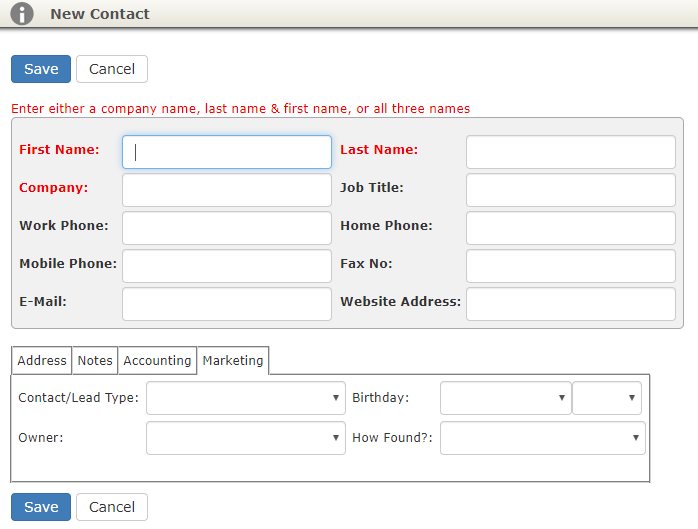
Contact Info
- First Name
- Last Name
- Company
- Job Title
- Work Phone
- Home Phone
- Mobile Phone
- Fax No
- Website Address
Note: You must enter either a First Name, Last Name, or Company into one of the fields to create a contact. You may enter all three if desired, but they must be unique to be saved.
At the bottom of the window you will see optional tabs to fill out more information.
Marketing
- Contact/Lead Type: Define the type of contact they are. Social, Bridal, Corporate, etc.
- Birthday: Keep track of client birthday’s for marketing purposes.
- Owner: Designate someone on your team as their main point of contact.
- How Found?: Keep track of where new clients are coming from. Direct Marketing, Word of Mouth, Google Search, etc.
Address
Enter the client’s main address information and directions to print on internal reports.
Notes
Make notes here and they will pop up whenever someone on your team is creating a new event for the contact.
- General Notes: Does the client prefer a specific type of disposable or alway want extra condiments?
- Special Diet: Is the client vegan or allergic to garlic?
Accounting
- Acc #: If you assign an account number to your clients, enter it here.
- Tax Exempt #: Enter a client’s tax exempt number here and all their new events will initially default to tax exempt.
- Tax Location: Assign a specific tax location to the client and all their new events will default to this location.
- Payment Terms: Set default payment terms for the contact. Net 30, Net 60, Cash, etc.
Once you have filled out the desired information, click Save to add to your TPP account. You will now be in the newly created Contact View for this client.
Contact View
Any information may be edited here and there are a few more tabs/fields available:
Main Tab
Authorize.Net Profile Id: This field is automatically populated when your account is connected to Authorize.net for credit card processing.
Credit Cards
Credit cards saved in your TPP integrated credit card account will show here with limited information:
- Card Type: Visa, Mastercard, etc.
- Card Number: Just the last 4 digits will show here.
- Name on Card: Will show the cardholder’s name.
- Address: Will show the card billing address.
- Default?: Allows you to designate a specific card as their default if they have multiple on file with you.
Tasks & Notes
See all Tasks and Notes pertaining to the Contact or create new ones for your team.
Event History
Easily see all the events for the Contact and view an abbreviated list of menus they’ve enjoyed.
Opportunities
Did the client mention that they just had an annual party for all 200 employees? Make a note here to follow up with them later to try and book them with your company next year.